I manually installed WordPress via FTP for my first 20 client sites, spending 30 minutes per installation configuring databases and permissions. When I discovered Softaculous, I realized I’d wasted 10 hours doing what an automated installer could handle in 60 seconds with better security.
Installing WordPress used to require a manual process involving FTP clients, manual database creation, and the famous five-minute install. While that method still works, it proves inefficient for professionals managing multiple sites because by 2026, the industry has standardized on automated script installers. Softaculous is the leader in this space, providing a powerful engine that handles the heavy lifting of file transfers and database provisioning. Understanding how to install WordPress using Softaculous requires technical precision for a clean, secure, and professional installation. If you’re new to the platform, you should start with our comprehensive WordPress Basics and Installation guide to understand the underlying infrastructure.
Why Softaculous Matters for WordPress Installation
Speed is not the only goal when installing WordPress professionally.
Accuracy is what matters most because a sloppy installation leads to security vulnerabilities and performance bottlenecks later. According to W3Techs WordPress Statistics, WordPress powers over 43 percent of the internet.
This massive market share makes it a prime target for automated attacks. Using an installer like Softaculous allows you to implement security best practices right from the first second of your site’s life.
Pre-Installation Technical Requirements for WordPress
Before you click any buttons, you must verify your server environment meets modern standards.
WordPress in 2026 requires current specifications to run effectively.
Required PHP and Database Versions
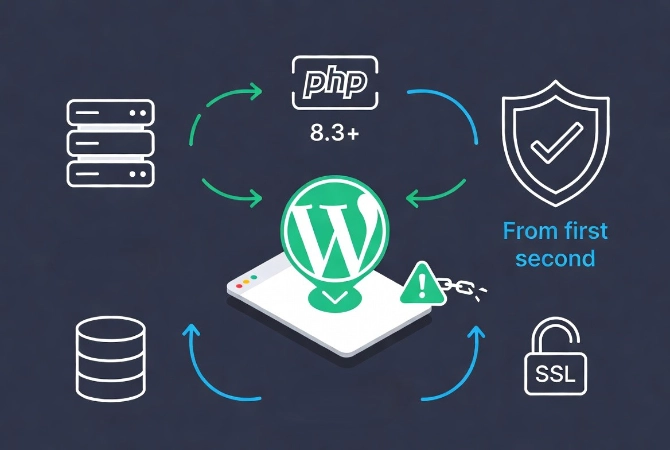
You need PHP 8.3 or higher for optimal performance and security.
Older versions like PHP 7.4 are end-of-life and pose significant security risks. Your server should also support MySQL 8.0 or MariaDB 10.11 as a minimum.
Most reputable hosts provide these specifications, but you should check your hosting dashboard first.
SSL Certificate Requirements
You also need an active SSL certificate before starting installation.
Browsers now flag non-HTTPS sites as dangerous to visitors. Most hosts offer free Let’s Encrypt certificates automatically.
Ensure your domain points to your server’s nameservers and that the SSL is active before you start the Softaculous process. This prevents issues where the installer tries to set the site URL to HTTPS but fails because the certificate isn’t yet valid.
Review our guide on Installing an SSL Certificate for WordPress for detailed instructions.
Accessing the Softaculous Interface
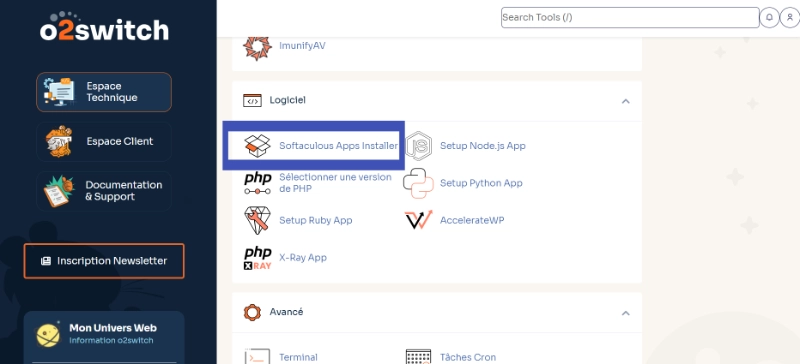
Log in to your hosting control panel first.
This is usually cPanel, DirectAdmin, or a proprietary dashboard provided by your host. Look for the Software section where you’ll see a Softaculous Apps Installer icon.
Click it to load a list of hundreds of scripts. WordPress is always the first one listed.
Choosing Custom Install Over Quick Install
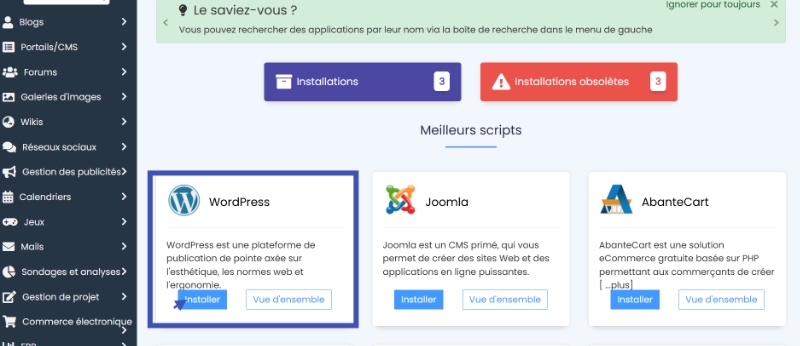
Click the Install button on the WordPress tile.
Do not use the Quick Install option because we’re going to use the Custom Install path to ensure every setting is configured correctly for a professional environment.
Configuring the Softaculous Software Setup
This is where most beginners make their first critical mistake.
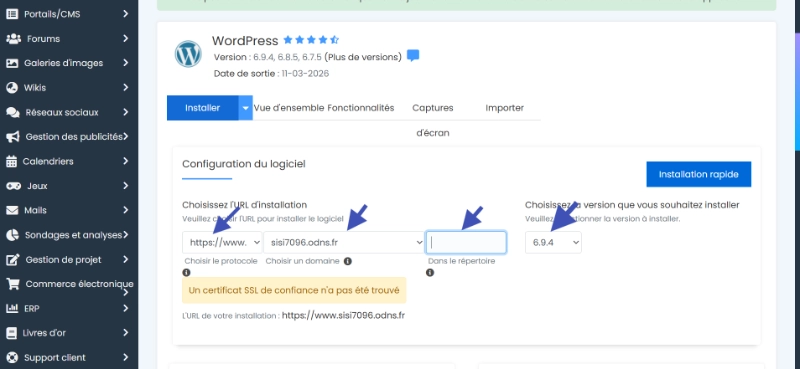
The Software Setup section dictates where your site lives and how visitors access it. You have three primary fields to fill out carefully.
Protocol Selection (HTTPS Required)
First, choose the protocol from the dropdown menu.
Always select https://www or https:// depending on your branding preference. If you have a specific branding preference, pick one and stick with it consistently.
But you must use the HTTPS version. If you don’t have an SSL yet, stop and get one before proceeding.
Domain Configuration
Second, choose the domain you want to use from the dropdown menu.
If you just bought the domain, it might take a few hours for it to appear here. Be patient because accuracy at this stage prevents broken links later.
Directory Settings
Third, examine the In Directory field carefully.
This should remain empty for most users. If you put “wp” in this box, your site will load at yourdomain.com/wp instead of the root.
Unless you’re intentionally hiding your WordPress core files in a subdirectory (a niche security tactic), leave this blank. You want your site to load at the root of your domain.
WordPress Version Selection
Softaculous also allows you to choose the WordPress version to install.
Always select the latest stable release because it contains the most recent security patches and performance improvements. Using an outdated version for compatibility with an old plugin is a bad trade-off that exposes your entire server to risk.
WordPress Site Settings and Administrative Credentials
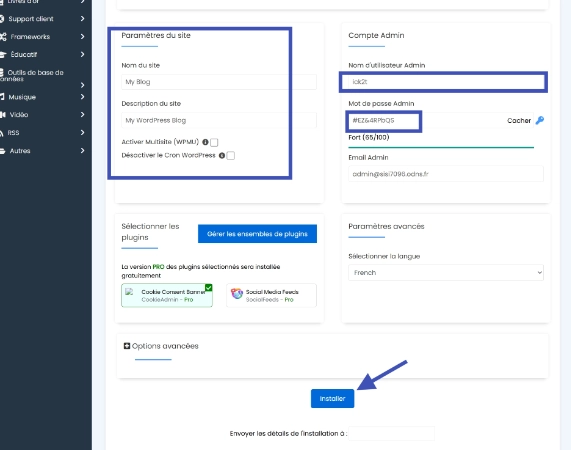
The Site Settings section appears straightforward but requires attention to detail.
Enter your Site Name and Site Description in the appropriate fields. Don’t worry too much about these right now because you can change them later in the WordPress dashboard.
However, do not leave them as “My Blog” or “Just another WordPress site.” This looks unprofessional and is bad for initial search engine indexing.
Creating Secure Admin Account
The Admin Account section is critical for long-term security.
This is the primary entry point for your site management. Do not use “admin” as your username because it’s the first name every brute-force bot tries to crack.
Choose something unique like your name, a brand identifier, or a random string. Use the password generator to create a strong password with at least 16 characters including numbers, symbols, and mixed-case letters.
Store this in a password manager immediately after creation.
Admin Email Configuration
Use an admin email that you actually check regularly.
WordPress sends critical notifications to this address. If your site gets hacked, or if a plugin update fails, the recovery link goes here.
Using a fake email is a common mistake that leads to locked-out accounts and recovery nightmares.
Advanced Softaculous Options for Professionals
This is where seasoned pros differentiate themselves from beginners.
Click the Advanced Options toggle, which is usually collapsed by default. Here you can control the database and update behavior of your site.
Database Configuration and Security
The Database Name and Table Prefix are generated automatically by Softaculous.
Change the Table Prefix from the default “wp_” to something unique like “site72_” or any random string ending in an underscore. This makes it harder for SQL injection attacks to target your specific database tables.
This simple step significantly improves your security posture against automated attacks.
Auto-Update Settings
Disable Update Notifications by email if you manage many sites, but keep them on if this is your only one.
More importantly, examine the Auto Upgrade settings carefully. I recommend enabling Auto Upgrade WordPress Plugins and Auto Upgrade WordPress Themes only if you have a solid backup system in place.
For the WordPress core, choosing “Upgrade to Minor Versions Only” is the safest bet. This ensures you get security patches without risking a major version update that might break your custom layout.
Learn more about safe updates in our guide on How to Safely Update WordPress Core.
Automated Backup Configuration
Softaculous also offers an automated backup feature worth configuring.
Select a backup location (local or remote) and set a rotation schedule. Keeping two or three recent backups on the server provides a good safety net.
But remember, a backup on the same server is not a true backup. You should eventually move these to a third-party storage service.
Review our comprehensive guide on How to Backup Your WordPress Website for best practices.
Executing the WordPress Installation
Once you have verified all your settings, scroll to the bottom of the page.
There’s a field to enter an email address for installation details. Use this because it provides a permanent record of your database name and credentials.
Installation Process Timeline
Click the Install button to begin the automated process.
The process usually takes less than a minute to complete. Softaculous copies files, creates the database, and configures the wp-config.php file for you automatically.
If it hangs at 95 percent, don’t refresh the page. Wait for it to finish or display an error message.
Most errors at this stage occur due to existing files in the directory or a database that wasn’t properly cleaned up from a previous attempt.
Immediate Post-Installation Tasks
When the installation completes, you’ll see two URLs displayed.
One is your public site. The other is your administrative login (usually yourdomain.com/wp-admin).
Verifying Site Health
Click the admin link to log in with your newly created credentials.
The first thing you should do is verify your site’s health. Navigate to Tools, then Site Health, and address any critical issues immediately.
Learn more in our guide on How to Use the WordPress Site Health Tool.
Configuring Permalinks
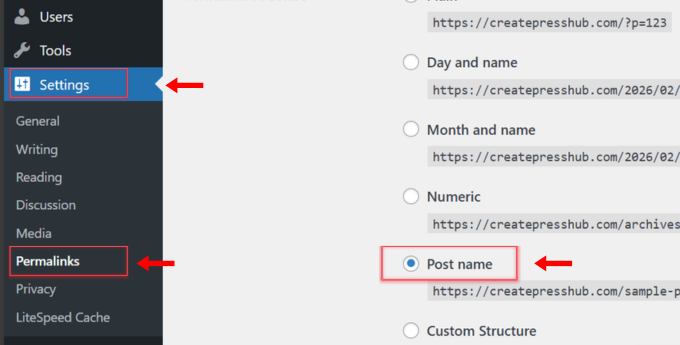
Next, configure your permalinks for optimal SEO and user experience.
By default, WordPress might use a messy structure with IDs and question marks. Change this to Post Name for clean, readable URLs.
For a deeper understanding of why this matters, read our WordPress Permalinks: The Ultimate Guide.
Removing Default Content
Finally, delete the default content that comes with every fresh installation.
WordPress installs a “Hello World” post and a “Sample Page” that look amateurish if they stay live. Delete them immediately.
You should also check the default “Hello Dolly” plugin. This serves no technical purpose and should be removed to keep your installation lean and secure.
Troubleshooting Common Softaculous Installation Errors
Sometimes the installation fails despite careful configuration.
Files Already Exist Error
A common error is “The following files already exist.”
This happens if you had a previous installation that wasn’t deleted correctly. Softaculous is protective and won’t overwrite existing files to prevent accidental data loss.
You must access your File Manager and manually delete those files before trying again.
Database Connection Error
Another issue is a database connection error during installation.
This usually means the server’s MySQL service is down or your hosting account has reached its database limit. Contact your host if this occurs because it’s rarely a problem with the Softaculous script itself.
According to Wikipedia: WordPress, the platform is built on a PHP and MySQL foundation, meaning any server-side instability in these languages will halt your installation.
404 Error on Dashboard Access
If you see a 404 error when trying to access your admin dashboard, it’s likely a caching issue or DNS propagation delay.
Wait an hour for DNS to propagate fully. If the problem persists, check your .htaccess file because Softaculous usually writes a standard .htaccess file, but occasionally server-specific configurations can interfere.
Best Practices for Professional Softaculous Installation
| Feature | Best Practice Recommendation |
|---|---|
| Protocol | Always use HTTPS |
| Directory | Leave blank for root installation |
| Admin Username | Avoid “admin” or “webmaster” |
| Database Prefix | Change from “wp_” to something unique |
| Auto-Updates | Enable for minor versions and security patches |
Frequently Asked Questions About Softaculous WordPress Installation
What is Softaculous and why use it for WordPress?
Softaculous is an auto-installer script available in most hosting control panels (cPanel, DirectAdmin). It automates WordPress installation in 60 seconds, handling file uploads, database creation, and configuration automatically with better security than manual methods.
Is Softaculous better than manual WordPress installation?
Yes, for most users. Softaculous is faster (60 seconds vs 30 minutes), reduces human error, implements security best practices automatically, and handles database configuration perfectly. Manual installation offers more control but requires advanced technical knowledge.
Can I install multiple WordPress sites with Softaculous?
Yes, absolutely. Softaculous allows unlimited installations on different domains or subdomains within your hosting account. Each installation gets its own database and configuration. This makes it ideal for agencies managing multiple client sites.
What should I do if Softaculous installation fails?
Check for existing files in the installation directory and delete them. Verify your hosting account hasn’t reached its database limit. Ensure SSL certificate is active if using HTTPS. Wait for DNS propagation if domain is new. Contact hosting support if errors persist.
Should I change the database prefix during Softaculous installation?
Yes, always change it from the default “wp_” to something unique like “site72_” or random string. This simple security measure makes SQL injection attacks significantly harder by obscuring your database table names from automated scripts.
Can I upgrade WordPress installed via Softaculous normally?
Yes, WordPress installed via Softaculous updates exactly like any WordPress installation. Use the built-in WordPress update system (Dashboard → Updates) or enable auto-updates. Softaculous just handles initial installation; ongoing maintenance is standard.
Additional Resources for WordPress Installation
Continue building your WordPress expertise with these essential guides:
- Master the foundation in WordPress Basics and Installation
- Secure connections via Installing an SSL Certificate for WordPress
- Update safely using How to Safely Update WordPress Core
- Protect data through How to Backup Your WordPress Website
- Verify health with How to Use the WordPress Site Health Tool
- Optimize URLs using WordPress Permalinks: The Ultimate Guide
Using Softaculous is the industry standard for WordPress installation in 2026 for good reason. The tool is reliable, fast, and precise when you feed it the correct configuration. Don’t rush through the setup screens because taking the time to customize your database prefix and set strong credentials prevents massive headaches in the future. Once your site is up and running, you can begin the process of building out your content and layout. By following this technical protocol, you ensure your WordPress site is built on a stable and secure foundation. The effort you put in now saves hours of troubleshooting and security remediation later. Return to WordPress Basics and Installation whenever you need to review the foundational concepts that make professional WordPress site management possible.