I built my client’s entire contact page using a Post instead of a Page, complete with categories and a published date stamp. When they saw “Posted in: General” at the top of their professional contact form, the embarrassment was immediate. Twenty minutes of rebuilding taught me the hard way why content type matters.
Creating a website requires a firm grasp of content hierarchy. In WordPress, pages serve as the foundation for your most critical, static information. This differs from posts, which are time-sensitive entries. If you’re just starting, you should review our WordPress Basics and Installation guide to ensure your environment is configured correctly. Understanding how to create a new page in WordPress represents the next logical step in building a professional presence once your site is live.
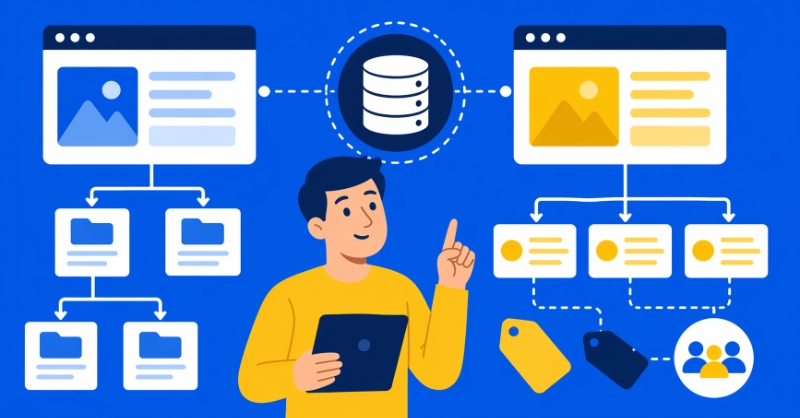
Understanding the Architecture: WordPress Pages vs. Posts
Technical precision matters when structuring a database.
WordPress treats pages and posts as distinct “post types.” You must choose the right one for your data.
How WordPress Pages Work
Pages are hierarchical, which means you can nest them.
A “Services” page might be the parent of a “Consulting” page. This creates a logical URL structure. Posts don’t do this because posts rely on categories and tags.
For a deeper look at how the software functions, see our What is WordPress? A Beginner’s Guide.
WordPress Pages vs Posts Comparison
| Feature | WordPress Pages | WordPress Posts |
|---|---|---|
| Timeline | Static, non-chronological | Dynamic, dated |
| Organization | Parent/Child hierarchy | Categories and Tags |
| RSS Feed | Excluded | Included |
| Use Case | About Us, Contact, Privacy | News, Blog articles, Updates |
Learn more in our detailed guide on WordPress Posts vs Pages: Key Differences.
The Step-by-Step WordPress Page Creation Process
Login to your administrative dashboard.
Locate the sidebar on the left. Hover over the “Pages” menu item. Two options appear: “All Pages” and “Add New Page.” Click “Add New Page.”
The system loads the Block Editor. By 2026, the editor has become a sophisticated design tool that’s no longer a simple text box. The interface is clean and focuses on the canvas.
Step 1: Assign a Title to Your WordPress Page

The first field is for your title.
Enter a clear, descriptive name. Use “About Our Firm” instead of just “About.” This title usually generates the H1 tag on the frontend and influences the initial permalink.
You can change this later, but starting with a strong title saves time.
Step 2: Use the Block Editor for WordPress Page Layout
The Block Editor uses discrete units of content.
Click the plus icon to add a block. You have many choices:
- Paragraph blocks for standard text
- Heading blocks for SEO structure
- Image or Gallery blocks for visual data
- Columns for advanced layouts
- Synced Patterns for recurring elements
Performance Considerations for Page Layouts
Avoid cluttering the page with too many elements.
Performance data shows that excessive DOM depth slows down mobile rendering. Use simple layouts. Stick to core blocks whenever possible because they’re faster and stay compatible during core updates.
Step 3: Configure WordPress Page Attributes
Look at the right-hand sidebar and click the “Page” tab.
This area controls the metadata for your page.
The WordPress Permalink
This is the URL for your page.
Keep it short. If your title is long, simplify the slug. For example, if the title is “Our Comprehensive Guide to Financial Success,” make the slug “financial-success-guide.”
You can learn more about this in our WordPress Permalinks: The Ultimate Guide.
Featured Image Settings
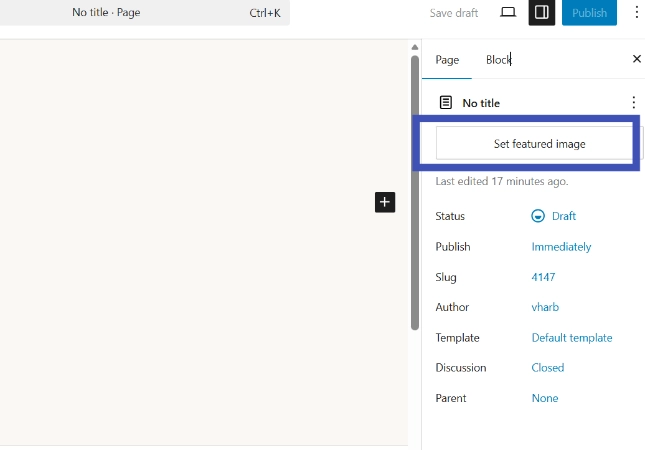
This image appears when the page is shared on social media.
It also shows up in some theme headers. Use high-quality, compressed WebP files for optimal performance.
Page Attributes and Hierarchy
Here you define the hierarchy for your page.
If this is a sub-page, select a “Parent Page.” You can also choose a “Template.” Most modern themes offer a “Full Width” or “No Sidebar” template. Choose the one that fits your content goals.
Technical Best Practices for WordPress Pages in 2026
Static pages must be efficient for modern search engines.
Search engines prioritize Core Web Vitals. WordPress has improved its native handling of image lazy loading and script deferral, but user input still dictates final performance.
Performance Optimization Guidelines
Data from Wikipedia confirms that WordPress powers over 40 percent of the web, largely due to its flexible page system.
To maintain this flexibility, follow these standards:
- Limit the number of high-resolution images to three per page unless it’s a gallery
- Use system fonts to reduce external HTTP requests
- Check the mobile preview (the Block Editor has a toggle for this)
- Write meta descriptions that are under 160 characters
WordPress Page Publishing and Visibility Controls
WordPress provides several visibility states.
You don’t have to publish a page immediately:
- Draft: Saves your work (only logged-in users with the right permissions can see it)
- Private: Only administrators and editors can see the page on the live site
- Password Protected: Only users with the password can view the content
- Public: The page is live for everyone
Scheduling WordPress Pages
You can also schedule a page for future publication.
Click the “Immediately” link next to “Publish” and a calendar appears. Select a future date and time. This proves useful for product launches or legal updates.
Managing Existing WordPress Pages
Go back to “All Pages” to view your library.
You can perform “Bulk Actions” here. If you need to delete multiple pages, select them and choose “Move to Trash.”
Using Quick Edit for WordPress Pages
The “Quick Edit” tool is a massive time saver.
Hover over a page title in the list and click “Quick Edit.” You can change the slug, the date, the parent page, and the status without loading the full editor. Use this for minor organizational changes.
Addressing Common WordPress Page Issues
Sometimes, a new page doesn’t show up in your navigation menu.
WordPress doesn’t always add new pages to menus automatically. You must do this manually.
Adding Pages to Navigation Menus
Navigate to Appearance, then Menus.
Or, if you use a modern block theme, go to the Site Editor. Add the page to your Navigation block.
Learn more in our guide on Creating and Managing Navigation Menus in WordPress.
Fixing 404 Errors After Slug Changes
Another issue is the 404 error after changing page slugs.
If you change a page slug after publishing, the old link breaks. WordPress tries to redirect it automatically, but it’s not perfect. Always verify your links after a slug change.
WordPress Accessibility and Heading Structure
Structured data and proper heading levels are non-negotiable for modern site owners.
When you create your page, ensure your headings follow a logical order (H2 follows H1, H3 follows H2). Don’t skip levels for styling purposes because this confuses screen readers.
Use CSS for styling instead.
Finalizing Your WordPress Page Workflow
Creating a page is more than clicking a button.
It’s about data integrity and user experience.
WordPress Page Creation Checklist
Start with a plan and know where the page fits in your site map.
Use the Block Editor to build a clean layout. Set your parent-child relationships. Optimize the slug. Finally, check the mobile responsiveness.
A well-structured page serves your audience for years. It remains a stable pillar of your digital presence.
Frequently Asked Questions About Creating WordPress Pages
What’s the difference between a WordPress page and a post?
Pages are static, hierarchical content for permanent site structure (About, Contact, Services). Posts are chronological, dated content that appears in your blog feed with categories and tags. Pages exclude from RSS feeds; posts include.
How do I create a new page in WordPress?
Go to Pages → Add New in your WordPress dashboard. Add a title, use the Block Editor to add content, configure page attributes (permalink, template, parent page), then click Publish or Save Draft.
Can WordPress pages have child pages?
Yes, pages support parent-child hierarchies. When creating or editing a page, select a “Parent Page” in the Page Attributes section. This creates URLs like yourdomain.com/parent-page/child-page/.
How do I add a WordPress page to my navigation menu?
Go to Appearance → Menus, select your menu, find your page in the “Pages” list, check it, and click “Add to Menu.” For block themes, use the Site Editor to add pages to Navigation blocks.
What are WordPress page templates?
Page templates are pre-designed layouts that control how your page displays. Common options include Default, Full Width (no sidebar), and custom templates. Select templates in the Page Attributes section of the editor.
Can I schedule a WordPress page to publish later?
Yes, in the Publish panel, click “Immediately” next to the publish date. Choose your desired date and time, then click “Schedule” to set it for future publication.
Additional Resources for WordPress Page Management
Continue building your WordPress page expertise with these essential guides:
- Master the complete process in WordPress Basics and Installation
- Understand platform basics with What is WordPress? A Beginner’s Guide
- Learn content differences through WordPress Posts vs Pages: Key Differences
- Optimize URLs using WordPress Permalinks: The Ultimate Guide
- Organize navigation with Creating and Managing Navigation Menus in WordPress
WordPress has evolved, but the core task remains the same. You provide the content, and the system provides the framework. Use the tools correctly, and your site will perform at a high level. Creating a page is about data integrity and user experience. Start with a plan, use the Block Editor to build a clean layout, set your parent-child relationships, optimize the slug, and check the mobile responsiveness. A well-structured page serves your audience for years and remains a stable pillar of your digital presence. Return to WordPress Basics and Installation whenever you need to review the foundational concepts that make professional WordPress site management possible.