
Professional man working on Elementor page builder interface on laptop in bright modern office

How to Install Elementor on WordPress in 5 Easy Steps (2026)

The first time I tried to install Elementor, I rushed through the process. I skipped the server checks, ignored the memory limit warning, and clicked Activate like I was in a race. Within an hour, the editor was hanging on every save, the widget panel refused to load, and I had a client waiting on a homepage that looked like a broken puzzle. Not my finest moment.

I learned that installing Elementor correctly is not just a technicality. It is the foundation that determines how smoothly everything you build will run. This guide walks you through how to install Elementor on WordPress the right way, so you avoid every frustrating mistake I made and get straight to building something great.

⚡ Quick Summary (TL;DR)

  • Verifying that your server meets the latest requirements prevents the WordPress editor from freezing up during your build.
  • You must always activate the free version of Elementor first before uploading the premium Pro ZIP file to your site.
  • Connecting your official license right after installation ensures you receive critical security updates and full access to the template library.
  • Turning on modern features like Flexbox Containers from day one will give your pages a major speed and performance advantage.
  • Testing a fresh installation in a private browsing window helps you spot and fix browser extension conflicts before you start designing.

Why Installing Elementor the Right Way Matters

Professional male freelancer working on website design at home office desk with natural light and laptop
A focused creative professional reviewing website banner concepts during a productive workday in a bright, minimalist workspace.

WordPress powers over 45 percent of all websites as of 2026. Most people who use it quickly realize the default Block Editor is fine for simple blog posts, but it cannot deliver the kind of polished, high-conversion layouts that real projects demand. That is where Elementor steps in as the industry standard for visual web development.

The thing is, Elementor is a sophisticated tool. It does a lot of heavy lifting behind the scenes, communicating with your server, loading widget libraries, and saving complex layout data. When your server is not configured properly before you install it, that heavy lifting turns into a workout your hosting environment simply cannot handle.

A clean installation sets up a stable, fast environment. It means fewer crashes, faster saves, and a smoother design experience from day one. So before you click a single button, let’s make sure your setup is ready.

Step 1: Verify Your Server Meets the Technical Requirements

Optimized WordPress Elementor setup illustration showing clean dashboard interface with workflow arrows and professional configuration elements
Proper server preparation before installing Elementor ensures stable performance and smooth visual editing in WordPress sites. This setup avoids common crashes and delivers faster layout building from the start.

This is the step most beginners skip entirely, and it is the single biggest reason installations go sideways. Your hosting environment needs to meet a minimum set of technical requirements before Elementor can run properly.

Head to your WordPress Dashboard, then go to Tools, then Site Health. Click the Info tab. This screen tells you everything about your current server setup. You are looking for a few key numbers.

RequirementMinimumRecommended
PHP Version8.18.3 or higher
Memory Limit256MB512MB or 1GB
MySQL Version5.68.0 or higher
SSL CertificateRequiredStrict HSTS

If your PHP version shows 7.4 or anything older, contact your hosting provider and ask them to upgrade it immediately. Older PHP versions are missing critical security patches and run significantly slower. Low PHP memory is the culprit behind the most common Elementor problem, which is an editor that freezes or fails to save your work.

Pro Tip: If you are on shared hosting and cannot control your memory limit directly, look for a php.ini file in your root directory and add the line memory_limit = 512M. Many hosts allow this override. When in doubt, ask their support team.

Step 2: Install the Free Version of Elementor

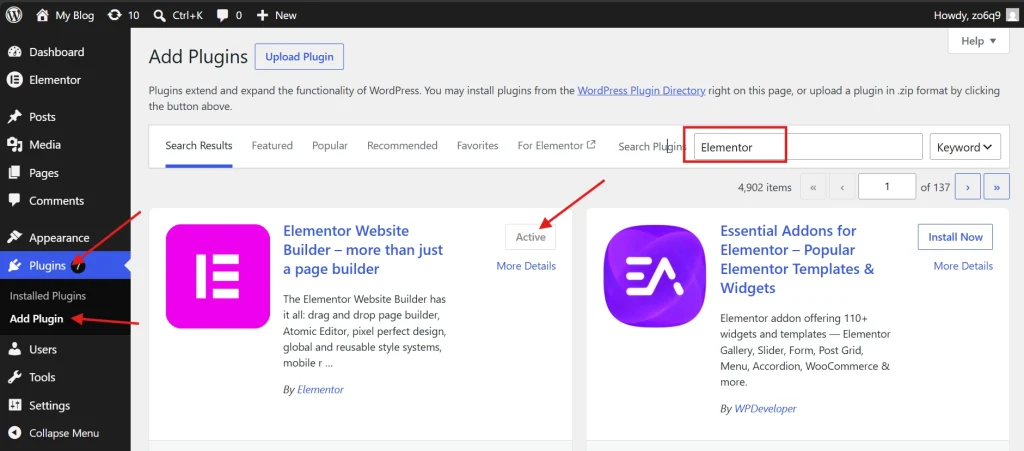
WordPress admin plugins page displaying active Elementor Website Builder with sidebar navigation highlighted
WordPress dashboard view of the Add Plugins screen where Elementor appears as active, demonstrating the correct navigation path through Plugins menu for professional site builders.

The free version of Elementor is the core engine that everything else runs on. Even if you plan to upgrade to Elementor Pro right away, you still need to install the free version first. Think of it as laying the foundation before building the walls.

Log in to your WordPress admin area and look at the left sidebar. Hover over Plugins and click Add New Plugin. In the search bar at the top right, type Elementor. The result you want is Elementor Website Builder by Elementor.com. It should be the very first result that appears.

Click the Install Now button and wait for the process to finish. Then click Activate. WordPress will take you to a welcome screen. You can skip the setup wizard if you prefer to configure things manually. For most beginners, the wizard is a perfectly fine way to get started quickly. Either way, once activation is complete, you will see a new Elementor item appear in your sidebar.

Pro Tip: Skipping the setup wizard gives you more control over your default settings. Professionals often prefer this approach because the wizard can enable certain assets and tracking features you may not want running on every page.

Step 3: Install Elementor Pro for Advanced Features

Elementor Editor Pro pricing plans comparison showing Advanced Solo and One options with birthday discounts
Compare current Elementor Pro plans including the Advanced Solo at $6.50 per month and the comprehensive One plan at $13 per month, both featuring significant birthday savings for WordPress users building professional sites.

If your project requires the Theme Builder, advanced form widgets, or custom CSS capabilities, you are going to need Elementor Pro. The Pro version is not available in the free WordPress repository. You purchase it directly from the official Elementor website and then upload it manually.

After completing your purchase, log in to your Elementor account and download the ZIP file to your computer. Here is the part that trips people up: do not unzip the file. WordPress handles plugin installations using the compressed format, and unzipping it before upload will break the process.

Go back to your WordPress dashboard. Navigate to Plugins, then Add New Plugin. This time, instead of using the search bar, click the Upload Plugin button at the top of the page. Choose the ZIP file you downloaded and click Install Now. Once installation finishes, click Activate Plugin. You now have both Elementor and Elementor Pro active on your site, working together as one unified system.

Connecting Your Elementor Pro License

A Pro license without activation is like a car without a key. You need to connect your license to unlock the full template library, receive security updates, and access new features as they launch.

After activation, a banner will likely appear at the top of your dashboard prompting you to connect. Click the Connect and Activate button. You will be redirected to the Elementor website. Log in with your account credentials and confirm the connection. Once authorized, your site will begin receiving updates automatically.

Warning: If you encounter an error during the license connection process, it is usually a communication issue between your server and the Elementor license server. Check that your server’s outgoing connections are not blocked by a firewall. Some managed hosting environments restrict these by default. If you run into persistent loading issues, the guide on How to Fix Common Elementor Loading Issues covers these scenarios in detail.

Step 4: Configure the Essential Post-Installation Settings

Elementor settings configuration interface illustration with General and Features tabs showing enabled containers and optimization options
Post-installation Elementor settings screen highlighting essential configurations like Flexbox Grid containers and image optimization for improved WordPress performance and modern layout building.

Default settings are rarely optimized for serious work. Spending five minutes adjusting a few things right after installation will save you hours of troubleshooting later. Go to Elementor in your sidebar and click Settings.

Under the General tab, make sure Post Types are checked for both Posts and Pages. This ensures the Elementor editor can be used across all your content types. Some developers disable it for Posts to keep the blog area simple, but that is a deliberate tactical choice, not the default you want for most projects.

Next, click the Features tab. This is where Elementor houses experimental features before they become permanent. In 2026, the two you absolutely want to enable are Flexbox Containers and Grid Containers. These systems have replaced the old Section and Column architecture that Elementor used for years.

The new Container system produces cleaner HTML, loads faster, and gives you more layout flexibility. If you are starting a brand-new project, use Containers from the beginning. The legacy layout system is deprecated and getting slower to support with every update. Starting fresh on the modern system is always the smarter move.

Pro Tip: While you are in the Features tab, also look for Image Optimization settings. Large unoptimized images are one of the primary reasons CMS-driven sites have high bounce rates. Enabling these features right from the start gives you a performance edge before you even build your first page.

Step 5: Test Your Installation Before You Build Anything

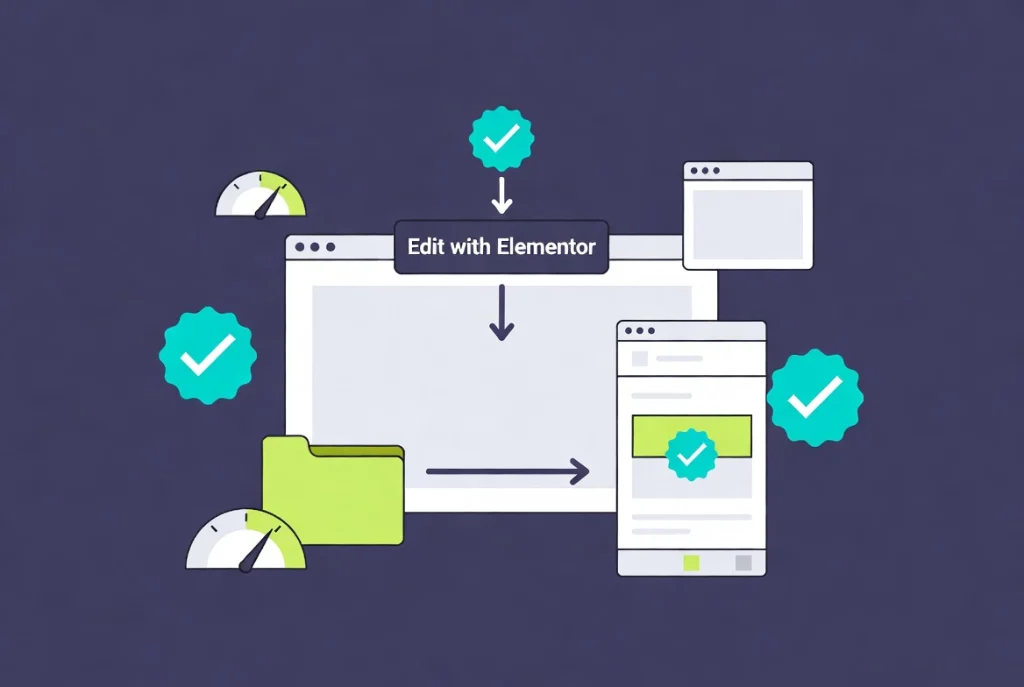
Elementor editor testing workflow illustration showing WordPress page to loaded template library insertion in clean interface
Visual representation of verifying a fresh Elementor installation by loading the editor quickly and successfully inserting templates from the library before starting major WordPress projects.

Do not assume the installation worked correctly just because WordPress did not throw an error. Take two minutes to actually verify the environment is stable before you invest time building anything significant.

Create a new page and click the Edit with Elementor button. The editor should load fully within three to five seconds. If it takes longer than that, your first suspect is browser extensions. Ad blockers and certain privacy extensions are well-known for interfering with Elementor’s loading scripts. Try loading the editor in a private browsing window to test this.

Once the editor loads, click the folder icon to open the template library. Try inserting a basic template block onto the page. If the library opens and the template inserts without errors, your installation is solid and stable. If you see a blank screen or a spinning loader that never resolves, you most likely have a memory issue or a plugin conflict on your hands.

Pro Tip: A common cause of plugin conflicts is security plugins with aggressive firewall rules. If you recently activated a security plugin, try temporarily deactivating it and retesting the Elementor editor. You can often whitelist Elementor’s requests in the security plugin settings rather than disabling it permanently.

Why Site Architecture Starts at the Install Phase

Clean versus cluttered website architecture illustration showing efficient Elementor combined widgets for optimal DOM structure
Professional comparison of site architecture best practices during Elementor setup, emphasizing clean code with combined widgets like Icon Box to maintain fast loading performance and scalability

Installing a plugin is the easy part. Building a scalable website is where the real work begins. Professionals think about something called DOM depth, which is essentially how many layers of HTML code your page generates. Every widget you drag onto the canvas adds code. The more code, the slower the page.

Elementor Pro helps manage this through combined widgets like the Icon Box. Instead of dragging separate widgets for an icon, a heading, and a paragraph, you use a single widget that generates one clean block of HTML. For a deeper look at this approach, the guide on How to Use the Elementor Icon Box and Image Box Widgets is a great next read.

Security is also worth mentioning here. Only ever download Elementor from the official Elementor website or the WordPress plugin repository. Avoid nulled or cracked versions entirely. These pirated plugins frequently contain backdoors and malware, and data from WordPress Security research consistently shows that a significant percentage of site compromises trace back to vulnerable or pirated plugins. Pay for the license. It protects your site, your clients, and your professional reputation.

Quick Summary: Best Practices Before Your First Build

Professional flat vector scene of Elementor page builder best practices setup with workflow icons around central monitor
Before your first Elementor build, optimize hosting, PHP limits, and editor settings while following a clear preparation workflow for smooth performance and security.

Use a quality hosting provider with NVMe storage. Confirm your PHP memory limit is 512MB or higher. Install the free version first, then upload Pro on top. Activate your license right away to start receiving security patches. Enable the Flexbox Container system and leave the legacy layout behind. Disable any widgets you do not plan to use to keep the editor snappy. Test the editor and template library before building anything.

If you want a broader foundation before diving into your first build, the Getting Started with Elementor hub is the best place to go for architecture context and advanced tutorials.

Additional Resources

Author

Our Newsletter

Get awesome content delivered straight to your inbox.

    Related Articles

    The Ultimate

    WordPress Toolkit

    Get FREE access to our toolkit – a collection of WordPress related products and resources that every professional should have!

    Leave a Comment

    white background featuring a white icon, representing the WordPress Toolkit guide.