

A client once called me three weeks after a site launch to ask why they had received zero inquiries despite solid traffic. I checked everything: layout, copy, CTAs, all fine. Then I tested the contact form. The submission went through visually, the thank-you message appeared, but no email ever arrived. The PHP mail function on the server was disabled. Every lead that form had captured over three weeks had vanished into a database no one was checking. The fix took fifteen minutes. The leads were gone.
Adding a contact form to an Elementor page is deceptively straightforward on the surface and genuinely complex underneath. A form that looks correct can fail silently in half a dozen different ways, and each failure costs real business. This guide covers the full technical setup from architecture decisions through spam protection, email delivery, privacy compliance, and conversion testing. The Getting Started with Elementor guide covers the interface foundation worth having before working through this. For the WordPress layer underneath everything here, the WordPress basics and installation guide is where that foundation begins.
⚡ Quick Summary (TL;DR)
- The native Elementor Pro Form widget keeps your site lightweight by eliminating the need for extra plugins while offering deep, code-free styling control.
- Selecting the correct field types like Tel or Email improves the mobile user experience by automatically triggering numeric keypads and browser-side validation.
- Activating the Collect Submissions action serves as a vital database backup to ensure you never lose leads if your email notifications fail silently.
- Setting up a dedicated SMTP plugin is required to replace the unreliable default WordPress PHP mail function and ensure notifications land safely in your inbox.
- Adding a Honeypot field and integrating Google reCAPTCHA v3 stops automated bot spam without adding annoying checkbox friction for real human visitors.
Choosing Your Form Architecture: Pro Widget vs Third-Party Plugins
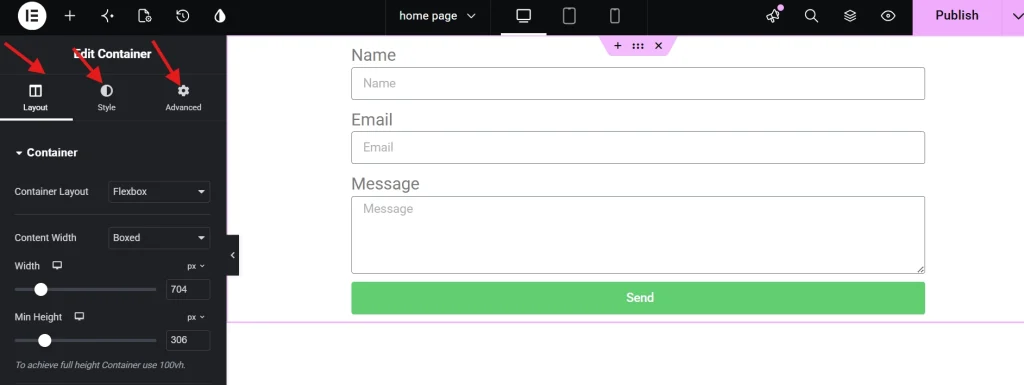
Two main paths exist for adding a contact form in Elementor. The native Form widget comes with Elementor Pro and keeps the site lean by eliminating the need for an additional plugin. It offers direct styling control through the Style tab without fighting external CSS, and it handles Webhooks and API integrations natively. For 90 percent of marketing and lead generation builds, the Pro widget is the right choice. If you are still weighing whether the Pro plan makes sense for your project, the Elementor Free vs Pro comparison covers the full feature breakdown.
The free version of Elementor requires a third-party plugin: WPForms and Contact Form 7 are the most common choices. Enterprise projects with complex conditional logic, multi-step flows, or payment integration requirements may need a dedicated form builder like Gravity Forms regardless of which Elementor plan is in use. Knowing the project requirements before committing to a plugin stack saves significant time compared to switching tools midway through a build.
Setting Up the Elementor Pro Form Widget
Finishing Strong with Your “Contact Us” Page and Layout Tweaks
Now that the main content areas of your site are looking sharp, it’s time to wrap things up by building a clean, functional “Contact Us” page. This final step is also the perfect opportunity to learn a few advanced layout positioning tricks that keep your site’s backend incredibly optimized and fast-loading. This tutorial guides you smoothly through setting up your contact info grid, making it look flawless on mobile, and officially crossing the finish line of your website build.
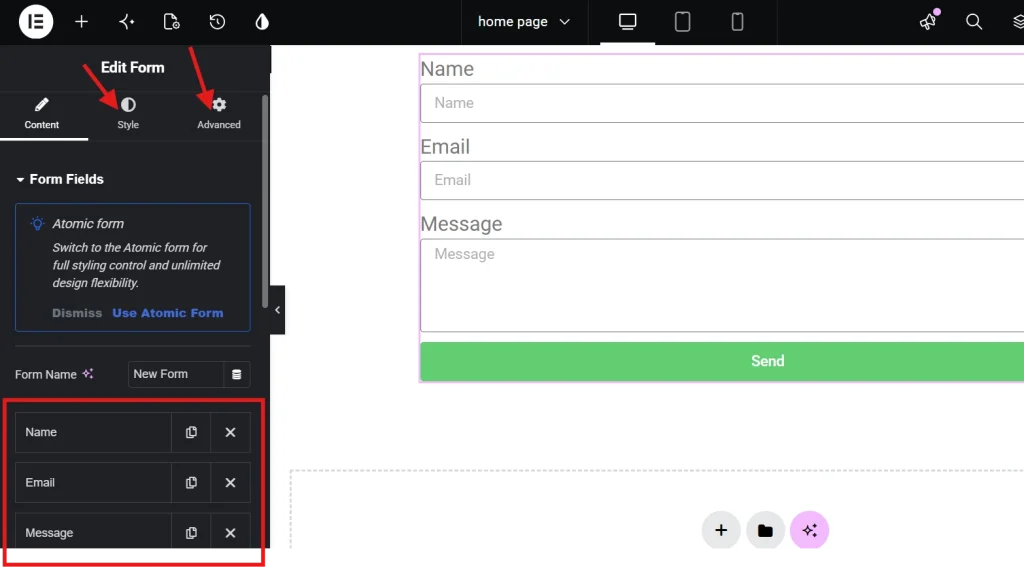
Search for the Form widget in the Elementor panel and drag it into your container. The default configuration provides Name, Email, and Message fields, which covers basic contact needs but rarely suits a professional lead capture setup. Each additional field reduces completion rates by roughly 3 to 5 percent, so the question to ask about every field is whether removing it would meaningfully reduce the quality of incoming leads. If the answer is no, the field should go.
Field type selection matters more than most designers realize. A phone number field set to the Tel type triggers the numeric keypad on mobile browsers automatically, which meaningfully improves the experience for mobile users. The Email type activates browser-side validation that catches incomplete addresses before submission reaches the server. Standard text fields used for these purposes skip both benefits and introduce friction that the correct field type eliminates for free.
Advanced Field Configuration for CRM Integration
The Advanced tab for each field contains the ID setting, which Elementor generates as a random string like “field_12345” by default. Any build that connects the form to a CRM or email marketing platform needs these IDs to match the data keys in the destination software. Renaming them to descriptive values like “first_name” or “user_email” at setup makes the integration mapping straightforward and simplifies troubleshooting when data arrives incorrectly formatted.
Dynamic tags open up a more sophisticated data capture strategy. A hidden field populated with a dynamic tag can pull the current page name or product title and include it in every submission without the user seeing it. A single contact form deployed across multiple landing pages then delivers submissions that already identify which page and product generated the inquiry, removing the need to trace that context manually from traffic data. The guide on Creating a Simple Landing Page with Elementor shows this approach applied to a full lead generation build.
Configuring Actions After Submit
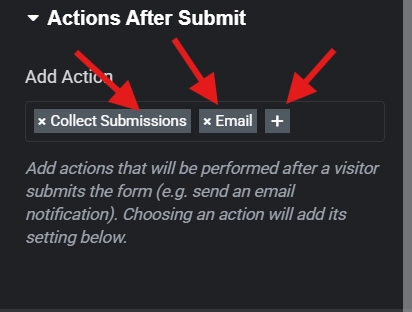
The Actions After Submit section controls what happens the moment a user clicks the submit button, and this is where many forms fail silently. Two settings should always stay active: the email notification and Collect Submissions. The database record that Collect Submissions creates serves as a backup when the email notification fails, which happens more often than most site owners realize. Checking the submission log in the WordPress dashboard periodically catches leads that email delivery dropped.
A redirect to a dedicated Thank You page after submission is worth the extra setup time. It gives Google Analytics a clean conversion event to track, provides an opportunity to set visitor expectations about response time, and separates confirmed leads from users who landed on the form page and left without submitting. Adding integrations like Mailchimp, ActiveCampaign, or a Webhook at this stage routes submission data directly into the tools that handle follow-up without requiring manual export and import between systems.
Email Notification Setup That Actually Works
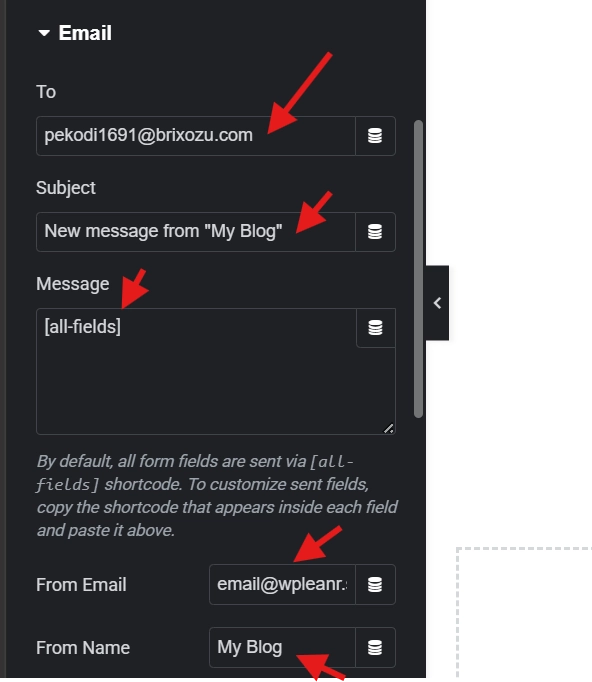
The default email notification sends to the WordPress admin address, which on many sites is a generic address no one monitors for sales inquiries. Changing it to the person who handles incoming leads, with a subject line formatted as “New Lead from [Site Name]: [Name Field],” means every submission arrives with enough context to act on immediately. The From Email address should match the site’s domain rather than the visitor’s email address. Sending notifications that appear to originate from a Gmail or Outlook address triggers spam filters because the site’s server lacks authorization to send on behalf of those providers.
Solving the Spam Problem

An unprotected form attracts bot submissions within days of going live. Beyond the obvious problem of corrupted lead data, high-volume spam submissions can push a mail server onto blacklists, which damages deliverability for all outgoing email from the domain. Three layers of defense address this effectively in Elementor.
The Honeypot adds a hidden field that human users never see but bots fill out automatically. Any submission that includes a value in the Honeypot field gets rejected without any impact on the user experience. For the second layer, reCAPTCHA v3 from Google monitors user behavior throughout the session and assigns a risk score. Low-scoring submissions get blocked without asking the user to complete any challenge, which preserves the conversion experience while filtering bot traffic. Registering the site on the reCAPTCHA platform to obtain API keys and pasting those keys into Elementor’s Integrations settings takes about ten minutes and handles the vast majority of spam attempts. The older reCAPTCHA v2 checkbox approach introduces friction that measurably reduces conversion rates on mobile and deserves retirement at this point.
The SMTP Requirement: Why PHP Mail Fails

WordPress relies on the PHP mail function by default for all outgoing email, including form notifications. Many hosting providers disable PHP mail to prevent their servers from becoming spam relays, and on servers where it remains active, the emails it sends frequently land in spam folders because they lack proper authentication headers. SMTP solves this by routing outgoing email through an authenticated mail server with proper domain credentials. Providers like SendGrid, Mailgun, and Google Workspace all work well for this purpose.
Installing an SMTP plugin and configuring it with the chosen provider’s credentials replaces the unreliable PHP mail function with authenticated delivery. After configuration, sending five test submissions and verifying that each arrives correctly in the target inbox, with the right From address, subject line, and field data, confirms the setup works before any real leads come through. Skipping this test is the setup decision most likely to cause the exact problem described at the start of this article.
Styling the Form for Conversion

The Style tab in Elementor gives full control over every visual aspect of the form, and the styling decisions that most affect conversion are often the least glamorous ones. Input field padding determines whether a form feels spacious and trustworthy or cramped and uncertain. Field borders should be subtle enough to recede behind the content while still clearly defining the input area. The Focus state, the border color change that appears when a user clicks into a field, provides the visual feedback that reduces cognitive load and keeps users oriented during completion.
The submit button carries more conversion weight than any other element in the form. High contrast against the surrounding layout, a label that describes the outcome rather than just the action, and sizing that makes it easy to tap on mobile all contribute to completion rates in measurable ways. Error messages deserve the same attention. “Please enter a valid phone number” communicates what went wrong and what to do about it. “Error” does neither.
Data Privacy and GDPR Compliance in 2026

Data privacy compliance is a legal requirement for any site collecting information from users in regions covered by GDPR or CCPA. Elementor includes an Acceptance field type specifically for consent collection. It must appear unchecked by default and require an affirmative user action to opt in. A pre-checked consent box does not satisfy GDPR requirements regardless of how clearly the surrounding text explains the data use.
Linking to the Privacy Policy near the submit button increases conversion rates alongside compliance. Users who understand how their data gets used share it more willingly than those who have no information to reference. The Collect Submissions database in WordPress accumulates lead records over time, and periodically exporting and deleting old entries keeps the database lean while reducing the scope of data subject to privacy regulations. For any configuration mistakes made during this setup, the Elementor History Tool provides a straightforward path back to a previous state.
Comparing Form Integration Methods
| Feature | Elementor Pro Widget | WPForms Free | Gravity Forms |
|---|---|---|---|
| Native Styling Control | High | Medium | Low |
| Conditional Logic | Basic | Limited | Advanced |
| CRM Integrations | Direct | Limited | Extensive |
| Ease of Use | Excellent | Good | Moderate |
Testing and Post-Launch Optimization
Testing the form on a real mobile device before launch catches issues the desktop editor preview never reveals. Input field tap targets, keyboard type triggering, and layout behavior at smaller viewport sizes all need verification on actual hardware rather than simulated screen widths. Running a test on a throttled 3G connection confirms the form loads and submits reliably for users on slower connections, where heavy scripts can cause submission failures that standard testing environments never expose.
After launch, monitoring the submission log for the first week identifies drop-off patterns before they compound into significant lead loss. A high rate of users who start the form but do not complete it usually signals that field count is too high. Removing one field and tracking whether the completion rate improves over the following week is the fastest data-driven way to find the right balance between lead qualification and friction reduction. The form is a tool for the business, not a design element for the page, and optimizing it after launch with real usage data produces results that pre-launch assumptions rarely achieve.
Additional Resources
- WordPress Basics and Installation: The Complete Beginner’s Guide
- Getting Started with Elementor in 2026: The Complete Guide
- Elementor Free vs Pro: Which Version Do You Need?
- Creating a Simple Landing Page with Elementor
- How to Use the Elementor History Tool
- Setting Up Global Colors and Fonts in Elementor
- How to Create a Custom Button in Elementor
- Responsive Design Basics: Making Elementor Sites Mobile-Friendly
- Elementor Best Practices for Beginners
- How to Preview and Publish Your Elementor Page
- reCAPTCHA: Wikipedia
- SMTP: Wikipedia
Final Thoughts: Treat the Form as a Revenue Tool
A contact form is the most direct revenue-generating element on most business websites, and it deserves the same technical attention as any other critical system. Configure SMTP before the site goes live. Enable Collect Submissions as a backup from day one. Test on a real mobile device and a slow connection before directing traffic to the page. Monitor the submission log in the first week and treat a high drop-off rate as a data signal rather than an aesthetic problem. These habits turn a contact form from a design checkbox into a reliable business tool. If you need to revisit the WordPress foundation beneath all of this, the WordPress basics and installation guide is always the right place to start.