I still remember the first time I opened WordPress and stared at a blank screen, wondering how anyone ever built a website that actually looked good. No code. No design background. Just a dream of a clean, professional site and zero idea where to start. Then I found Elementor, and everything changed.
Getting started with Elementor is one of the best decisions a beginner web designer can make in 2026. This drag-and-drop page builder now powers over 9.5 percent of all websites globally, according to W3Techs data. That number tells you something important. This tool is not just a hobby project or a shortcut for lazy developers. It is a serious, professional-grade platform used by freelancers, agencies, and solo creators who need to build fast without sacrificing quality.
In this guide, I am going to walk you through everything I wish someone had told me when I was just starting out. We will cover the architecture, the interface, your first project, key widgets, and the workflow habits that separate beginners from pros. Whether you have never touched a page builder before or you are migrating from an older setup, this is the foundation you need. And if you are still getting comfortable with WordPress itself, I recommend starting with this WordPress basics and installation guide before diving into Elementor.
Before we dive in, make sure your WordPress environment is ready to go. If you need to get the software installed first, start with our guide on How to Install Elementor on WordPress: A Step-by-Step Guide and then come right back here.
Why Modern Elementor Layouts Use Flexbox Containers
Here is something that surprised me when I came back to Elementor after a couple of years away. The whole architecture had changed. Gone were the days of rigid sections and columns. The modern Elementor uses Flexbox Containers, and once you understand why, you will never look back.
Flexbox Containers allow you to control alignment, direction, and spacing directly inside a single container element. Instead of wrapping everything in layer after layer of nested divs, you now work with a cleaner, lighter structure. For your visitors, that translates into faster load times, because the browser has fewer lines of code to parse before it can show them your page.
The three-tier hierarchy in Elementor today goes like this: you have the Page at the top level, which holds Containers. Inside those Containers, you place Widgets. That is it. Once that logic clicks, every layout decision becomes intuitive. To really get comfortable with this new approach, I highly recommend reading How to Use Elementor Flexbox Containers: A Beginner’s Guide. It changed how I think about building pages entirely.
For a deeper look at how these pieces connect, check out Understanding Elementor Sections, Columns, and Widgets. The relationship between containers and widgets is the backbone of every design you will ever build in this tool.
Pro Tip: If you have been building with the old column system, do not try to replicate it inside containers. Take the time to learn the new logic from scratch. The mental model shift is worth every minute.
Mastering the Elementor Interface for Beginners
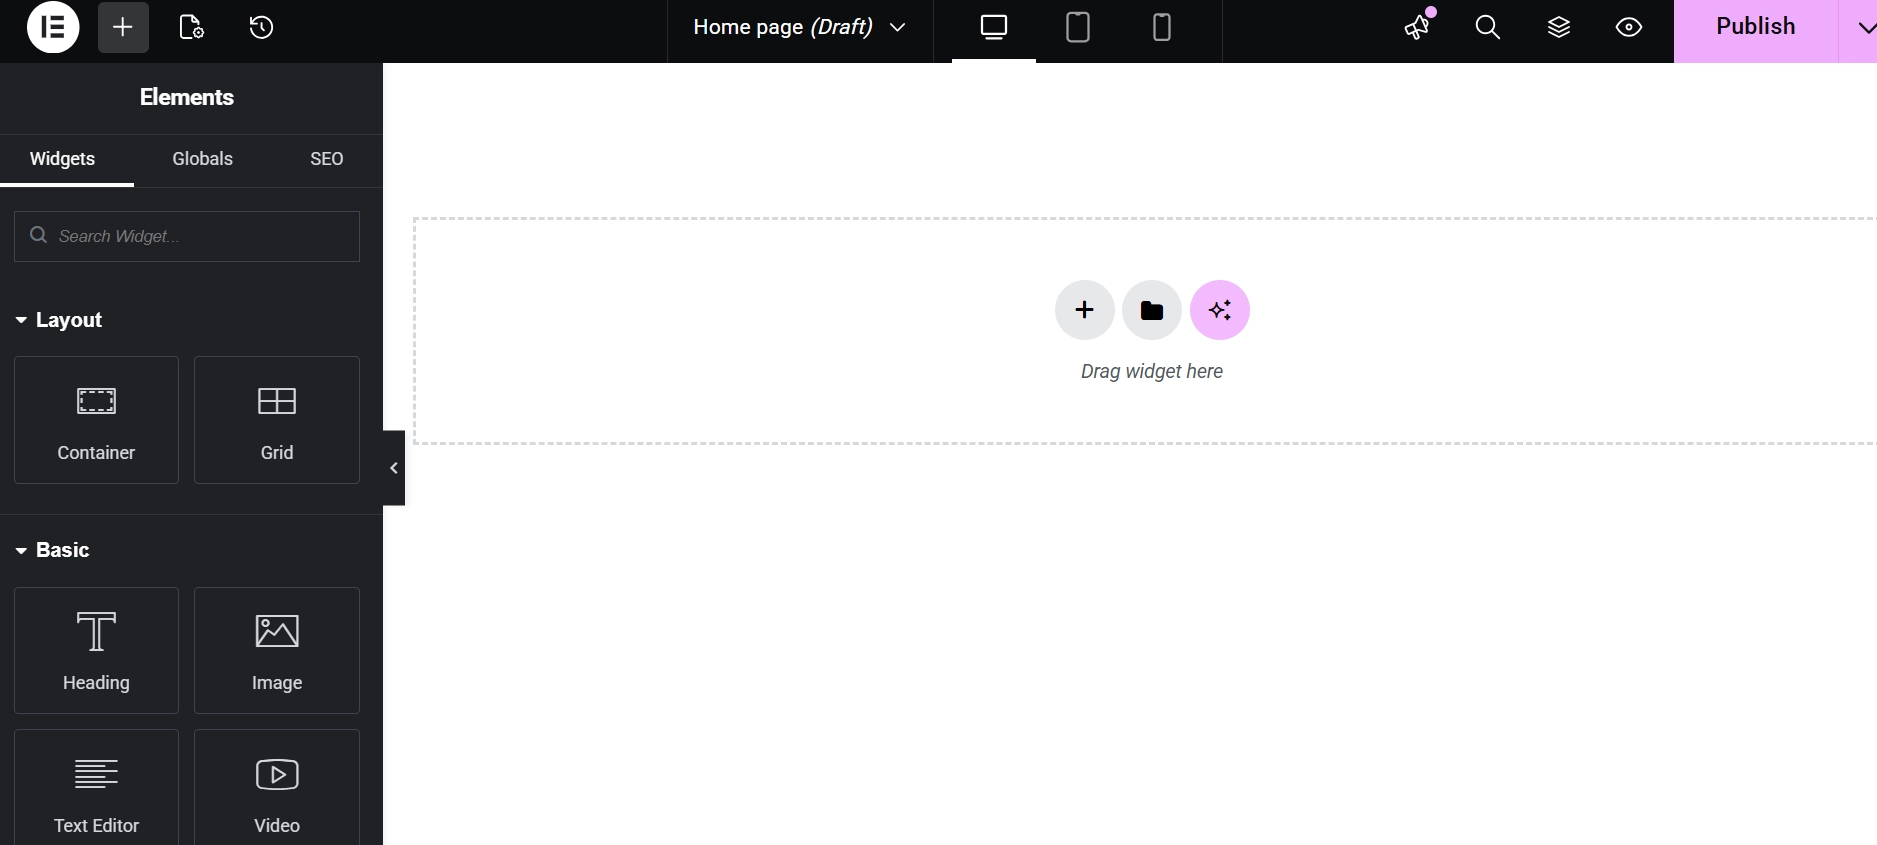
The first time you open the Elementor editor, it can feel a little overwhelming. There is a panel on the left, your live page on the right, and a toolbar along the bottom. I promise it is more organized than it looks.
The left panel is split into three main tabs, and each one has a specific job. The Content tab handles the what, where you type text, drop in images, and configure the basic substance of each widget. The Style tab handles the how, meaning colors, font sizes, borders, shadows, and spacing. The Advanced tab is where the technical details live, things like CSS classes, Z-index controls, and entrance animations. Get a full walkthrough of all these settings in the Elementor Interface Tour: Understanding the Editor Panel.
Using the Navigator to Manage Complex Elementor Layouts
One tool that I ignored for way too long when I was starting out was the Navigator. It sounds minor, but on a page with ten sections and thirty widgets, it becomes indispensable. The Navigator gives you a tree view of your entire page layout. You can click on any element in that list to select it instantly, and you can drag items to reorder them without hunting through the canvas.
If you have ever spent five minutes trying to click on a small element buried behind another one, the Navigator is your fix. Learn exactly how to use it at Elementor Navigator: How to Manage Complex Layouts.
How to Start Your First Elementor Page Project
My honest advice for anyone getting started with Elementor: do not start with a full website. Start with a single page. Pick something small and finish it. The confidence you build from completing one page well will carry you through everything that comes after.
Before you add a single widget, you need to pick a layout mode. You can choose between a blank canvas, which strips away your theme header and footer for a fully custom look, and a full-width layout that keeps your theme elements in place. The right choice depends entirely on your project. For a clear explanation of which to use when, read How to Change Page Layouts (Canvas vs Full Width) in Elementor.
Once your layout mode is set, it is time to actually start building. Follow the process in How to Create Your First Page with Elementor for a guided walkthrough. The process involves dragging a widget from the panel into a container, but having a visual plan before you do it will save you a lot of backtracking.
Setting Up Global Colors and Fonts for a Consistent Elementor Design

Here is a mistake I see beginners make constantly, including past me. They pick a color for one button, a different shade for another, manually set every heading font, and then wonder why their site looks a little off. The issue is inconsistency, and the fix is global styles.
When you set your brand colors and fonts at the global level in Elementor, they apply across the entire site. Change one setting, and every instance updates automatically. This saves hours of repetitive work and keeps your design looking unified and professional. Set yours up correctly with Setting Up Global Colors and Fonts in Elementor.
For fine-tuning individual text elements, the typography settings are where you will spend a lot of time. Line height, letter spacing, font weight, all of it is adjustable with precision. Dig into those settings at Editing Text and Typography in Elementor.
Elementor Free vs Pro: Which Version Do You Actually Need?
This is one of the most common questions I get from people just starting out, and the answer depends on what you are trying to build. The free version of Elementor is genuinely useful. It includes more than 30 core widgets, the drag-and-drop editor, and everything you need for basic page layouts.
However, most professional projects eventually hit the ceiling of the free version. The Pro version unlocks the Theme Builder, which lets you design custom headers, footers, and archive pages. It also includes the Form widget, which is essential for lead capture, and the ability to write custom CSS per element. Read the full breakdown with pricing details at Elementor Free vs Pro: Which Version Do You Need? to figure out which makes sense for your budget and your goals.
Working With Visual Assets and Media in Elementor
Websites are visual experiences. Adding an image is easy. Styling it so it actually looks sharp across every screen size is where most beginners struggle, and where your site either looks amateur or professional.
Always think about aspect ratios and file sizes before you upload anything. A massive, uncompressed image will slow your page to a crawl, and page speed directly affects your search rankings. Use modern formats like WebP wherever you can. For solid styling guidance, see Adding and Styling Images in Elementor.
If you want more visual depth, background layers are your friend. A semi-transparent color overlay over a background image can add a level of polish that makes your designs feel intentional rather than thrown together. Learn how at How to Add Background Images and Overlays in Elementor.
For high-end landing pages where motion matters, video backgrounds can be a powerful differentiator. The technical setup is not as complex as it sounds. Walk through it at Adding Video Backgrounds to Elementor Sections.
Warning: Never use auto-playing video backgrounds without ensuring they are muted by default. Auto-playing audio is one of the fastest ways to make a visitor immediately leave your page.
Elementor Workflow Tips That Will Save You Hours
Speed is a real competitive advantage in this industry. The faster you can build without cutting corners on quality, the more clients you can take on, the faster you can launch your own projects, and the more time you get back for the things you actually enjoy.
The single most powerful habit you can build in Elementor is saving your work as reusable templates. If you design a great testimonial section, save it. If you spend two hours perfecting a pricing table, save it. Next time you need that element, you import it in seconds instead of rebuilding it from scratch. Get the full workflow at How to Save and Reuse Elementor Templates.
Elementor also ships with a massive built-in template library. You can pull in professionally designed blocks or complete page layouts and then customize them to fit your brand. When a client needs something live by tomorrow, this library is your best friend. Explore it at How to Use the Elementor Template Library.
Mistakes happen, and they should not cost you hours of work. Elementor’s History tool tracks every change you make during a session and stores older versions as revisions. Accidentally deleted a section you spent an hour building? The History tool brings it back. Learn how to use it at How to Use the Elementor History Tool.
Pro Tip: Get into the habit of saving your work every fifteen minutes with CMD+S or Ctrl+S. The History tool is great for recovering from mistakes, but it is not a substitute for regular saves.
The Essential Elementor Widgets Every Site Needs
One of the most common beginner mistakes is trying to use every widget in the sidebar on your first project. Trust me, I did this. The result was a bloated, slow page that looked like someone had thrown every feature at a wall to see what stuck.
Start with the basics and use them well. The Button widget is one of the most critical elements on any page. A clear, well-styled call-to-action button can be the difference between a visitor converting and a visitor leaving. See exactly how to build a great one at How to Create a Custom Button in Elementor.
Beyond buttons, a few other widgets are near-universal on professional sites. Icon Boxes are essential for feature lists and service breakdowns, covered in detail at How to Use the Elementor Icon Box and Image Box Widgets. Dividers and Spacers help you create visual breathing room between sections, explained at Using the Elementor Divider and Spacer Widgets. Local business sites almost always need a map embed, and Google Maps integration is simpler than you might think, as shown at How to Add Google Maps to Your Elementor Site.
For a comprehensive overview of the full widget library, browse the Elementor Widgets Overview: The Most Used Elements.
Responsive Design Basics: Building for Mobile-First in 2026
In 2026, more than 60 percent of web traffic comes from mobile devices. That number has been climbing for years, and it is not going down. If your site does not work beautifully on a phone, you are already losing more than half your potential audience before they even read your first sentence.
Elementor has a built-in Responsive Mode that lets you toggle between Desktop, Tablet, and Mobile views directly inside the editor. You can adjust font sizes, hide entire sections on specific devices, and fine-tune spacing per breakpoint. This is not optional. This is table stakes for getting started with Elementor the right way. Start building the habit now with Responsive Design Basics: Making Elementor Sites Mobile-Friendly.
Accessibility is also something you need to think about, both because it is the right thing to do and because it has real SEO implications. Use proper heading structures on every page, add descriptive alt text to every image, and make sure your color contrast meets WCAG standards. These small habits compound into a significantly better site over time.
Elementor SEO, Maintenance, and Long-Term Site Health
Building the site is only half the job. Keeping it performing well is the other half, and this is where a lot of beginners drop the ball after launch.
Elementor works seamlessly with all the major SEO plugins, but you still need to configure your individual page settings correctly. Page titles, meta descriptions, and canonical tags none of these handle themselves. Get the fundamentals right with Basic SEO Settings for Elementor Pages.
When you are making major updates to a live site, use Maintenance Mode. It signals to search engines that your site is temporarily unavailable rather than broken, protecting your rankings while you work. Set it up with Customizing the Elementor Maintenance Mode.
Technical issues are rare, but they do happen. If the editor ever fails to load, it is usually a server resource issue or a plugin conflict, not something catastrophic. Do not panic. The guide at How to Fix Common Elementor Loading Issues walks through the most common fixes step by step.
For performance, the golden rule is restraint. Every widget you add increases page weight. Clean layouts with intentional design choices almost always outperform dense, widget-heavy pages. Before you publish anything, go through How to Preview and Publish Your Elementor Page to make sure everything is exactly right. And for the bigger picture of best practices, read Elementor Best Practices for Beginners.
Frequently Asked Questions About Getting Started with Elementor
Do I need to know how to code to use Elementor?
No, and that is exactly the point. Elementor was built so that designers and business owners can create professional websites without writing a single line of code. The drag-and-drop interface handles layout, styling, and content visually. That said, knowing basic CSS does give you more control over custom styling, and Elementor Pro gives you a custom CSS field per element when you are ready to explore that.
Is Elementor free, or do I have to pay for it?
Elementor offers a free version that is genuinely capable for basic projects. It includes the drag-and-drop editor and more than 30 widgets. The Pro version unlocks the Theme Builder, Form Builder, and a much larger widget library. For most freelance or business sites, Pro is worth the investment, but starting with the free version to learn the interface is a perfectly reasonable approach.
Will Elementor slow down my WordPress site?
It can, if you use it carelessly. Every widget and element you add has some weight. The key is to build with intention, keep your layouts clean, compress your images, use modern formats like WebP, and rely on global styles instead of individual overrides everywhere. A well-built Elementor site is fast. A bloated one is not, and that is a design decision, not a tool limitation.
What is the difference between Containers and the old Sections and Columns?
Sections and Columns were the original Elementor layout system. They used a fixed grid structure that required multiple nested divs for complex designs. Containers, which use CSS Flexbox, replaced this system with a lighter, more flexible approach. Containers produce cleaner code, load faster, and give you more direct control over alignment and spacing. If you are starting fresh in 2026, use Containers from day one.
Can I use Elementor with any WordPress theme?
Elementor works with most WordPress themes, but some themes integrate more smoothly than others. For the cleanest experience, many designers use Elementor’s own Hello theme, which is a minimal, lightweight base that gets out of the way and lets Elementor control the entire design. If you are using a third-party theme, check for known compatibility before building anything complex.
How long does it take to build a site with Elementor?
That depends heavily on the complexity of the project and how familiar you are with the tool. A simple landing page can be done in a few hours once you know the basics. A full business site with custom headers, footers, and multiple page templates might take several days. The more you use templates and global styles, the faster your workflow becomes over time.
Additional Resources
- WordPress Basics and Installation: The Complete Beginner’s Guide
- How to Install Elementor on WordPress: A Step-by-Step Guide
- Elementor Interface Tour: Understanding the Editor Panel
- Elementor Free vs Pro: Which Version Do You Need?
- How to Create Your First Page with Elementor
- Understanding Elementor Sections, Columns, and Widgets
- How to Use the Elementor Template Library
- Editing Text and Typography in Elementor
- Adding and Styling Images in Elementor
- How to Create a Custom Button in Elementor
- Elementor Navigator: How to Manage Complex Layouts
- Responsive Design Basics: Making Elementor Sites Mobile-Friendly
- How to Save and Reuse Elementor Templates
- Setting Up Global Colors and Fonts in Elementor
- How to Use the Elementor History Tool
- Adding a Contact Form to Your Elementor Page
- How to Use Elementor Flexbox Containers: A Beginner’s Guide
- Creating a Simple Landing Page with Elementor
- How to Add Background Images and Overlays in Elementor
- Elementor Widgets Overview: The Most Used Elements
- How to Change Page Layouts (Canvas vs Full Width) in Elementor
- Adding Video Backgrounds to Elementor Sections
- How to Use the Elementor Icon Box and Image Box Widgets
- Basic SEO Settings for Elementor Pages
- How to Fix Common Elementor Loading Issues
- Using the Elementor Divider and Spacer Widgets
- How to Add Google Maps to Your Elementor Site
- Customizing the Elementor Maintenance Mode
- How to Use Elementor Shortcodes in Your Content
- Elementor Best Practices for Beginners
- How to Preview and Publish Your Elementor Page
Final Thoughts: Build with Structure, Not Just Speed
After five years of working with Elementor and helping dozens of beginners and small business owners build their first sites, the most important lesson I can pass on is this: slow down at the beginning to go faster later. Set up your global styles before you build your first page. Understand the Container logic before you start dragging widgets. Save your templates as you go.
Getting started with Elementor is about more than dragging things around a canvas. It is about understanding the logic of the web and applying it with intention. When you build with structure, use global styles consistently, and keep performance in mind from the very beginning, you end up with sites that look great, load fast, and are easy to maintain for years.
Use this guide and the resources linked throughout it as your roadmap. If you ever feel like you need to go back to the WordPress fundamentals first, the WordPress basics and installation guide is the right place to start. Come back to different sections as you hit new challenges. And most importantly, start building something today, because the only way to truly learn Elementor is to use it.
