Essential WordPress Settings to Review After Installation
I still cringe when I think about my first WordPress site launch.
I spent weeks designing the perfect layout, writing compelling content, and choosing the ideal plugins. But I left all the default WordPress settings untouched. Three months later, I discovered Google was showing “Just Another WordPress Site” in search results, my URLs were a mess of numbers, and I was still discouraging search engines from indexing my site.
There is no universal list of settings that fits every site. Review each setting against the site’s purpose before changing it, especially the WordPress Address, Site Address, search-engine visibility, front page, registration, and permalink structure. A wrong URL can make the dashboard inaccessible, and leaving search visibility disabled can keep a finished site out of search results.
Practical checklist
- Set the timezone to a city or correct UTC offset and verify scheduled publishing.
- Keep search-engine visibility discouraged only while the site is genuinely private or unfinished.
- Record the current permalink structure before changing it on an established site and plan redirects.
Configuring essential WordPress settings immediately after installation isn’t optional—it’s the foundation everything else builds on. Skip these steps, and you’re creating technical debt that will haunt you for months. This guide builds on our WordPress Basics and Installation series to help you get these critical settings right from day one.
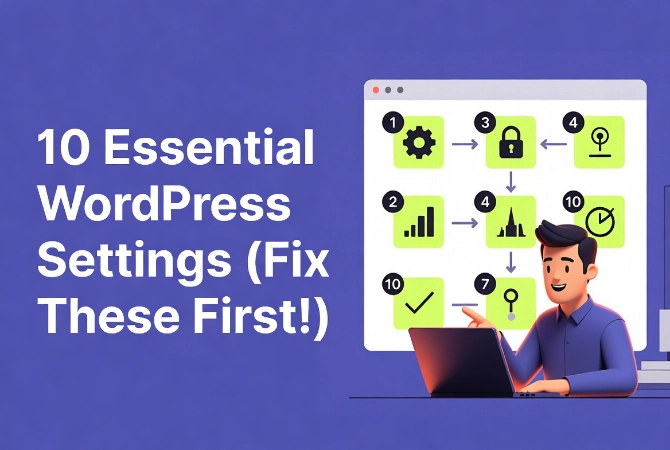
In this guide, I’ll walk you through the 10 most important WordPress settings that separate professional sites from amateur ones.
⚡ Quick Summary (TL;DR)
Backend Access Hardening: Securing user accounts requires replacing generic admin login credentials and altering your public display name to hide your backend login username from public scrapers, mitigating automated brute-force attempts.
SEO URL Architecture: Leaving default numeric URLs (?p=123) blocks search engines from reading your link keywords. Switching instantly to the post name format in your permalink settings is a baseline requirement for modern SEO.
Brand & Indexing Hygiene: Replacing the default “Just Another WordPress Site” tagline fixes unprofessional metadata in Google results. Similarly, toggling off search engine visibility during staging prevents incomplete placeholder layouts from being indexed.
Anti-Spam & Server Protection: Disabling pingbacks, trackbacks, and unmoderated comment blocks automated botnets from flooding your database with malicious links, preserving your server resources and overall site health.
Why Default WordPress Settings Create Problems
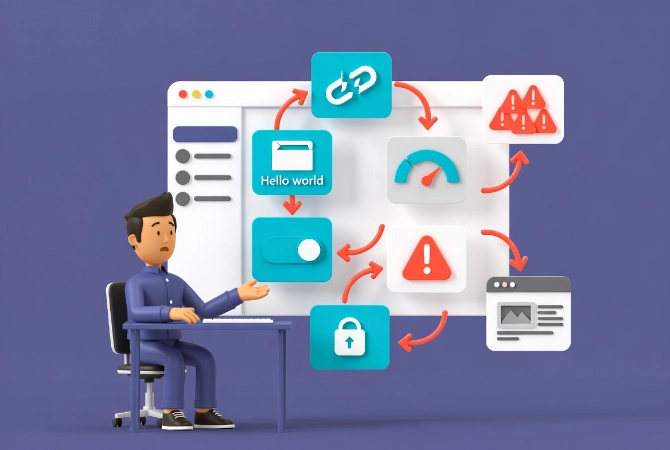
A fresh WordPress installation comes with generic configurations designed for broad compatibility.
But compatibility isn’t optimization. These defaults favor getting WordPress running quickly over performance, security, or search engine visibility.
The Technical Debt Starts Immediately
Every default setting you leave unchanged becomes harder to fix later.
Change your permalink structure six months after launching? You’ll need 301 redirects for every single post and page. Forget to disable development mode? You’re invisible to search engines. Leave default content? You look like an amateur who couldn’t be bothered to configure their site properly.
I learned these lessons the hard way so you don’t have to.
1. Fix Your WordPress Permalink Structure Immediately
This is the single most important setting to change before publishing anything.
WordPress defaults to ugly URLs like “?p=123” that give zero context to search engines or humans. These numeric strings hurt your SEO and make your site look unprofessional.
How to Set Up Clean, SEO-Friendly URLs
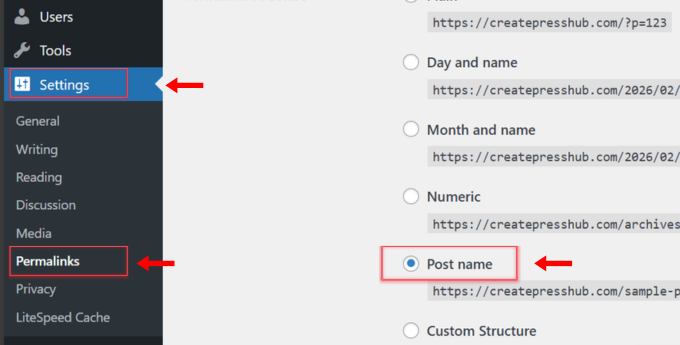
Here’s what to do right now:
- Go to Settings → Permalinks
- Select the Post name option
- Click Save Changes
This creates clean URLs like “yoursite.com/contact” instead of “yoursite.com/?p=42”.
Why This Matters for SEO
According to data from Wikipedia on search engine optimization, having keywords in your URL slug is a baseline SEO requirement.
Search engines parse URLs to understand page content. “yoursite.com/wordpress-security-tips” tells Google exactly what the page is about. “yoursite.com/?p=18” tells it nothing.
The Painful Consequence of Changing This Later
I once had to fix permalinks on a site with 200+ published posts.
Every URL changed, breaking all external links. I spent days setting up 301 redirects to prevent 404 errors. Traffic dropped 40% during the transition because some redirects failed.
Save yourself this nightmare by fixing permalinks before you publish anything.
2. Replace “Just Another WordPress Site” Immediately
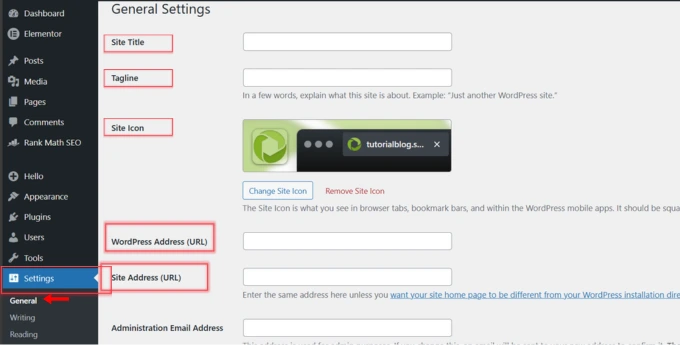
This default tagline appears in search results, browser tabs, and social shares.
It screams, “I didn’t bother configuring my site.” “Google indexes it and shows it to potential visitors. That’s not the kind of professional impression you want to make.
Configure Your Site Identity Properly
Here’s how to fix it:
- Navigate to Settings → General
- Enter your actual site title in Site Title
- Write a descriptive tagline or leave it blank
- Verify both URLs show HTTPS (if you have an SSL certificate)
- Click Save Changes
The HTTPS Critical Warning
If your WordPress address and site address still show HTTP instead of HTTPS, change them, but only after confirming your SSL certificate is active.
Get this wrong, and you’ll lock yourself out of your dashboard. Most modern hosts provide free Let’s Encrypt certificates. Please ensure that yours is installed and working before changing these URLs.
3. Set Your WordPress Timezone Correctly
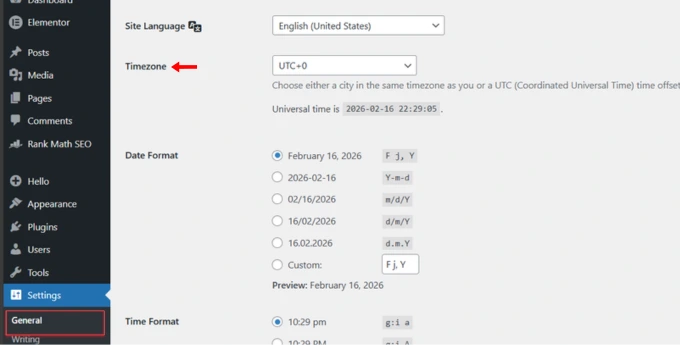
Your server time isn’t necessarily your local time.
I once scheduled a product launch post for 9 AM, only to have it publish at 2 PM because my timezone was wrong. The timing was critical—our email campaign went out at 9 AM linking to a post that didn’t exist yet.
Why WordPress Time Zone Settings Matter
If you schedule posts, run automated backups, or display timestamps to visitors, timezone accuracy is critical.
How to Configure Timezone Settings
Follow these steps:
- Go to Settings → General
- Scroll to the Timezone section
- Choose a city-based timezone (like New York or London)
- Don’t use UTC offsets—they don’t handle Daylight Saving Time
- Select appropriate date and time formats for your audience
- Click Save Changes
US audiences typically expect the month/day/year format. European audiences expect Day/Month/Year. Choose what makes sense for your visitors.
4. Disable Search Engine Indexing During Development
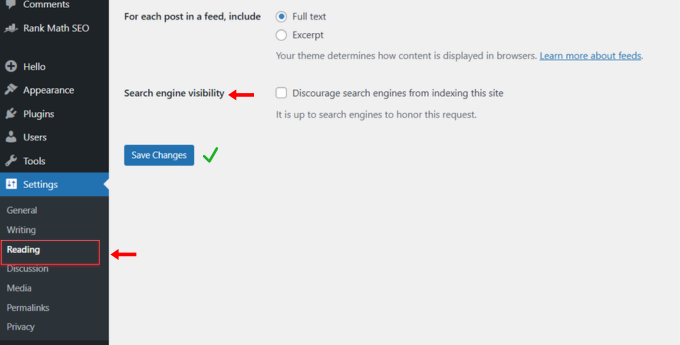
This option is the setting everyone forgets to change.
During development, you want to block search engines from indexing your placeholder content, broken layouts, and test pages. But once you launch, you need to uncheck this setting or you’ll remain invisible to Google forever.
How to Control Search Engine Visibility
Here’s the process:
- Navigate to Settings → Reading
- Check “Discourage search engines from indexing this site” during development
- Remember to uncheck it before launch
- Set a calendar reminder so you don’t forget
The Three-Month Traffic Mystery
I consulted for a business owner who was furious their site had zero organic traffic after three months.
They’d done everything right: great content, solid SEO, and quality backlinks. Except they never unchecked the “discourage search engines” box after launching.
Google honored their request perfectly. No indexing, no traffic.
Think of this setting as a construction site where you don’t want inspectors inside while the wiring is exposed. Just remember to take the sign down when you open for business.
5. Delete WordPress Default Content Immediately
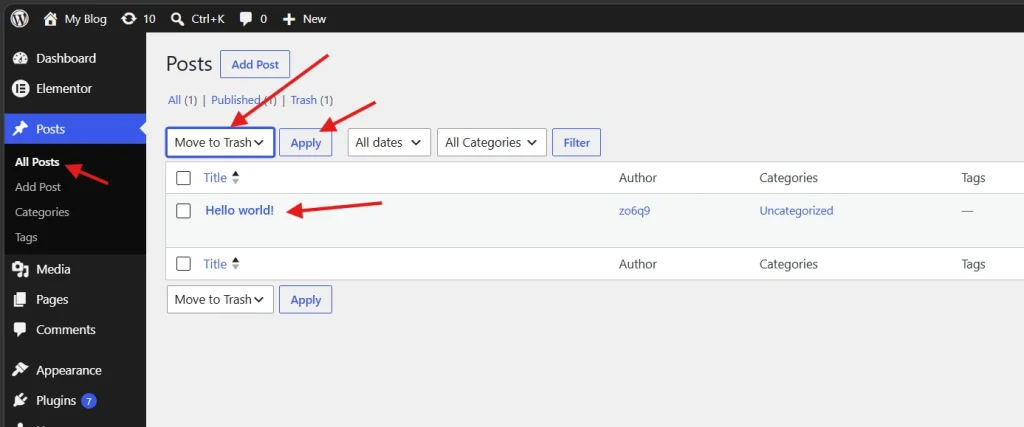
Every WordPress installation includes placeholder content nobody needs.
The “Hello World!” post, sample page, and default comment are digital clutter that makes you look unprofessional.
Clean Up Your Fresh WordPress Installation
Delete these immediately:
- Go to Posts → All Posts
- Move “Hello World!” to trash
- Navigate to Pages → All Pages
- Delete the sample page
- Check comments and delete the sample comment
- Empty the trash to permanently remove everything
Why This Matters Beyond Appearances
Leaving default content doesn’t just look amateur; it creates database clutter.
Your internal site search might return “Hello World!” in results. Your archive pages might include placeholder content. Start clean, stay clean.
6. Configure WordPress Comment and Discussion Settings
Comment spam is a massive resource drain.
Without proper controls, bots will flood your site with malicious links, fake pharmaceutical ads, and gibberish designed to exploit your site for SEO juice.
Protect Your Site from Comment Spam
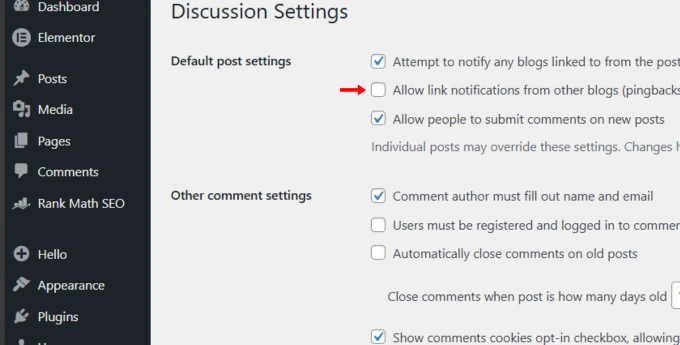
Here’s my recommended configuration:
- Navigate to Settings → Discussion
- If you don’t need comments, uncheck “Allow people to submit comments on new posts.”
- If you want comments, check “Comment must be manually approved” for first-time commenters
- Uncheck “Allow link notifications from other blogs (pingbacks and trackbacks).”
- Click Save Changes
Why Disable Pingbacks and Trackbacks
Spammers primarily use these archaic features to exploit your server resources.
Legitimate bloggers don’t use pingbacks anymore. But bots absolutely do, generating thousands of fake notifications that bog down your database.
The tighter your comment restrictions, the less time you spend cleaning up bot-generated garbage.
7. Optimize WordPress Media Upload Settings
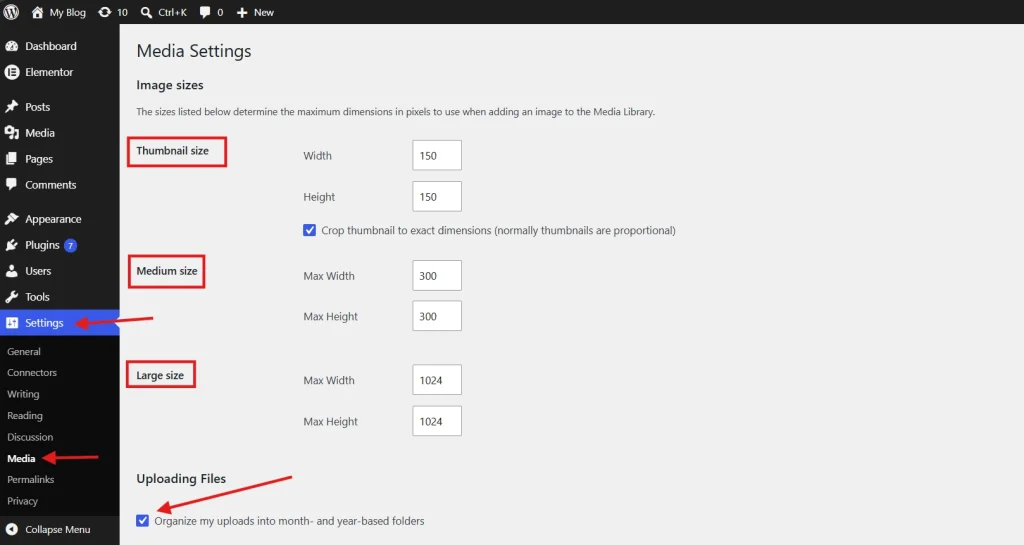
WordPress automatically creates multiple copies of every image you upload.
By default, it generates thumbnail, medium, and large versions. If your theme doesn’t use these specific sizes, they’re just wasting disk space and slowing down backups.
Configure Media Settings for Your Site
Follow these steps:
- Go to Settings → Media
- Review the thumbnail, medium, and large size settings
- If you use a modern image optimization plugin or CDN, consider setting unused sizes to zero
- Check “Organize my uploads into month- and year-based folders.”
- Click Save Changes
The folder organization keeps your server file structure manageable as your media library grows.
For comprehensive guidance, refer to our guide on Managing Your WordPress Media Library.
8. Change the Default “Uncategorized” Category
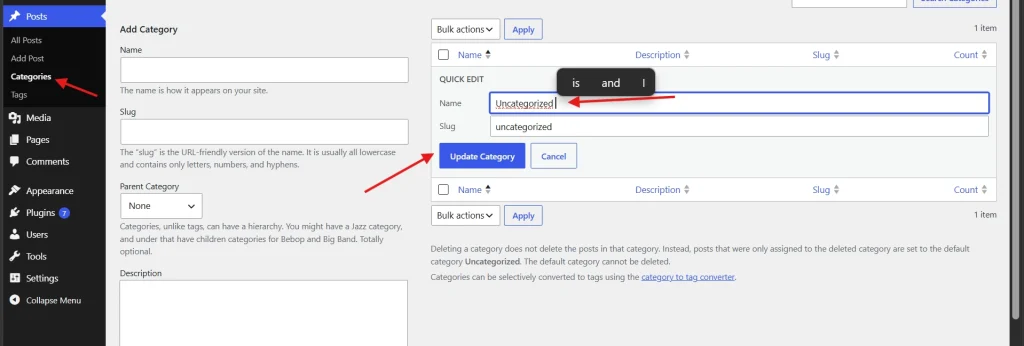
Every WordPress post needs a category.
If you don’t assign one, WordPress uses “Uncategorized.” This looks terrible in URLs and on your front end—like you couldn’t be bothered to organize your content properly.
Create a Professional Default Category
Here’s how to fix it:
- Navigate to Posts → Categories
- You can’t delete “Uncategorized,” but you can rename it
- Change it to something relevant like “General News” or “Updates.”
- Go to Settings → Writing
- Set your renamed category as the default post category
- Click Save Changes
This small detail drastically improves your site architecture’s professionalism.
9. Secure Your WordPress User Profile Settings
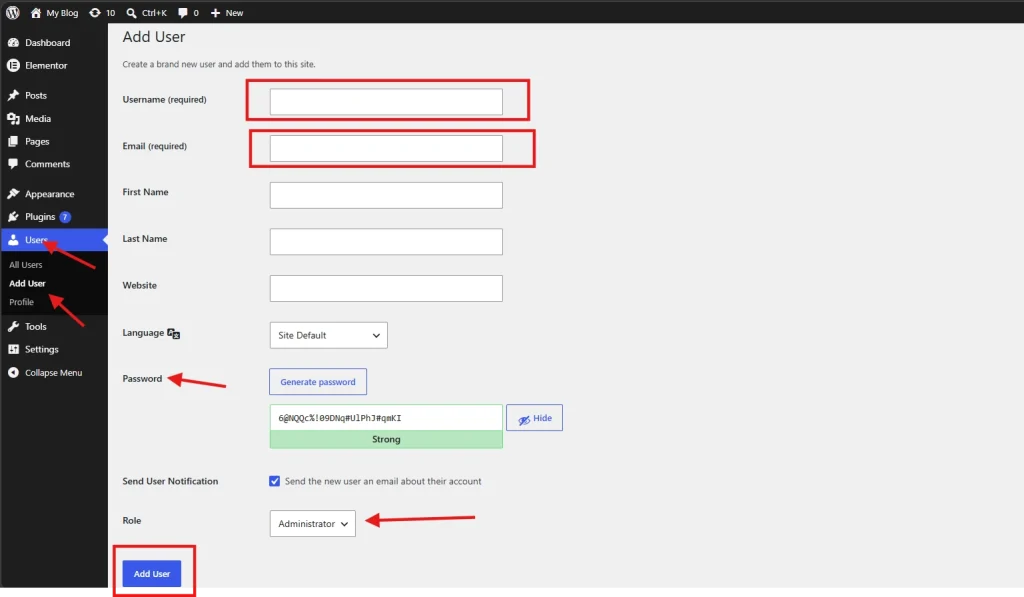
Security starts with your user account configuration.
Many WordPress installations still use “admin” as a username, giving hackers half the credentials they need for brute-force attacks.
Fix Your User Profile for Better Security
Take these security steps:
- If you’re using “admin” as a username, create a new administrator account with a unique name
- Log in with the new account
- Delete the old “admin” account
- Navigate to Users → Profile
- Set your Display Name publicly as something different from your login username
- Click Update Profile
Why Display Names Matter for Security
WordPress often shows your username publicly by default.
This hands attackers half the information they need. Using a different display name adds a simple layer of obscurity that protects your backend.
Plus, it looks better on author bios and comment replies.
For next steps in securing your site, see our guide on How to Install and Manage WordPress Plugins.
10. Set Up a Static WordPress Front Page
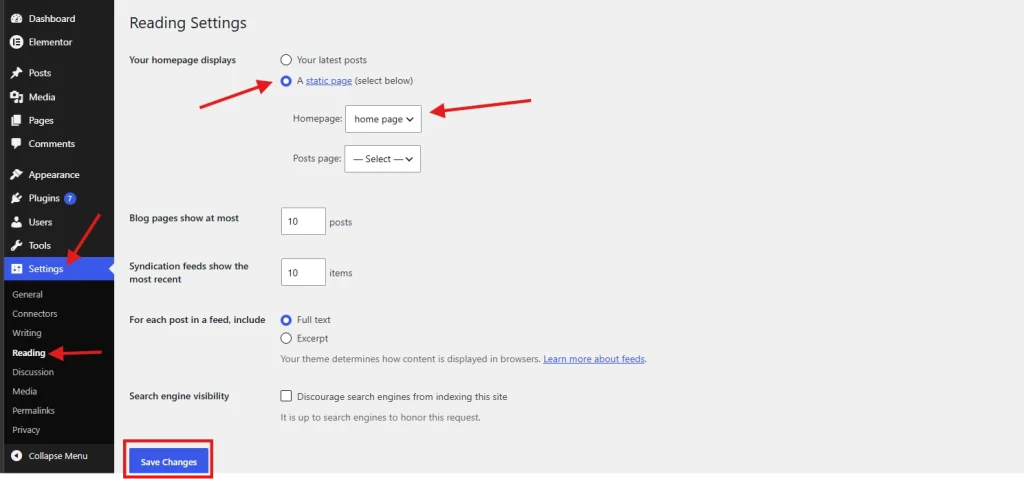
By default, WordPress shows your latest blog posts on your homepage.
This works fine for news sites or traditional blogs. But for businesses, portfolios, or professional brands, you need a custom landing page that converts visitors into customers.
Create a Professional Homepage Structure
Here’s the setup process:
- Go to Pages → Add New
- Create a page titled “Home” (publish it, even if it’s blank for now)
- Create another page titled “Blog.”
- Navigate to Settings → Reading
- Change “Your homepage displays” to “A static page.”
- Select “Home” for the homepage
- Select “Blog” for the posts page
- Click Save Changes
Why This Matters for Conversions
A chronological list of blog posts isn’t a strategic entry point.
You need control over the first thing visitors see—your value proposition, call-to-action, featured products, or services. A static homepage lets you design a high-converting experience instead of showing whatever you published most recently.
Your WordPress Configuration Checklist
These ten settings form the foundation of a professional WordPress site.
Skipping them creates technical debt that compounds over time. Every default you leave unchanged becomes harder to fix as your site grows.
Complete This Checklist Today
Here’s your immediate action plan:
- ✓ Fix permalink structure to post name format
- ✓ Replace default tagline with your actual brand messaging
- ✓ Configure timezone and date formats correctly
- ✓ Set search engine visibility appropriately for your launch status
- ✓ Delete all default WordPress content (Hello World, sample page, sample comment)
- ✓ Configure comment and discussion settings to prevent spam
- ✓ Optimize media upload settings for your needs
- ✓ Rename the default “Uncategorized” category
- ✓ Secure user profile and display name settings
- ✓ Set up a static front page structure
Next Steps After Configuration
With these foundational settings locked in, you’re ready to move forward confidently.
Continue building your WordPress expertise with these resources:
- Master the basics with our comprehensive WordPress Basics and Installation guide
- Learn proper organization with Managing Your WordPress Media Library
- Extend functionality safely using How to Install and Manage WordPress Plugins
- Stay current with web standards at the World Wide Web Consortium (W3C)
WordPress is a powerful platform, but it requires a disciplined approach to configuration. These settings aren’t optional for anyone serious about their web presence—they’re the foundation everything else builds on.
Reliability in the digital space is built on small, precise actions. Take thirty minutes today to configure these settings properly, and you’ll save yourself months of troubleshooting and technical cleanup later.