My first Elementor site took three weeks to build and two months to fix. Every font size sat as a manual override. Every color choice was a one-off decision. When the client asked to change the primary brand color, I spent four days hunting through forty-seven widgets updating hex codes by hand. The site loaded in eight seconds. The mobile layout broke on every Android device we tested.
Every problem traced back to the same root cause: building without a disciplined process. Elementor’s drag-and-drop interface makes starting easy, but easy starts without structure produce bloated, inconsistent, slow sites that punish every future edit. This guide covers the ten foundational practices that prevent those problems from the first page forward. If the Elementor interface is still new, the Getting Started with Elementor guide covers the core interface before diving into best practices. For the WordPress layer beneath everything here, the WordPress basics and installation guide is where that foundation starts.
1. Learn the Section, Column, Widget Hierarchy Before Building Anything
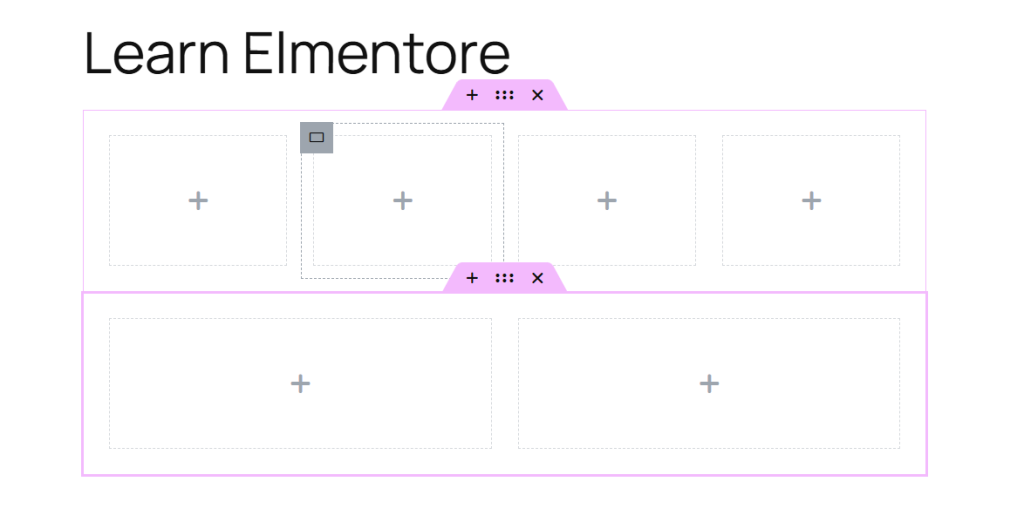
Every Elementor page rests on a three-level structure: Sections form the largest horizontal containers. Columns subdivide each section into vertical layout areas. Widgets populate those columns with actual content. Understanding that hierarchy before placing a single element prevents the most common beginner mistake: using Spacer widgets and arbitrary padding to force alignment that proper column structure would handle automatically.
Treat every page like a grid. Each section serves one clear purpose. Each column organizes the content within that purpose. Widgets fill the predefined spaces. This disciplined approach produces cleaner HTML, makes future edits straightforward, and gives search engine crawlers a logical document structure to read. The guide on Understanding Elementor Sections, Columns, and Widgets covers this hierarchy in full detail.
2. Configure Global Settings Before Designing Any Page

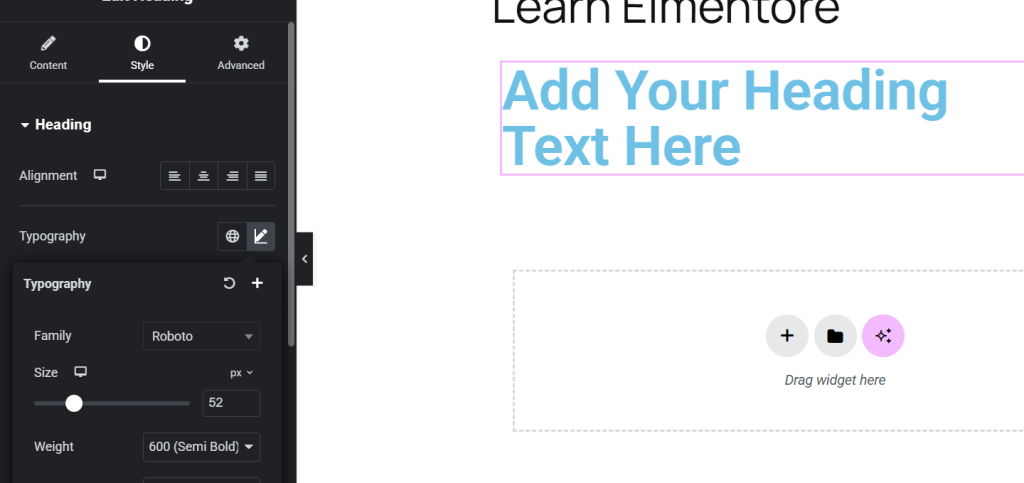
Global Settings and Theme Style in Elementor let you define typography, color palettes, button styles, and form appearances at the site level rather than the widget level. Setting these up before building a single page saves hours of rework and prevents the inconsistency that manual overrides create across a multi-page site.
Define the full color palette first: primary, secondary, accent, text, and background colors. Then establish heading styles for H1 through H6 and paragraph styles with line height and letter spacing. Every widget that draws from these global definitions updates automatically when the definition changes. A client rebrand that changes the primary color takes thirty seconds instead of four days. The guide on Setting Up Global Colors and Fonts in Elementor walks through every setting in the panel.
3. Use Core Widgets First, Add-Ons Only When Necessary
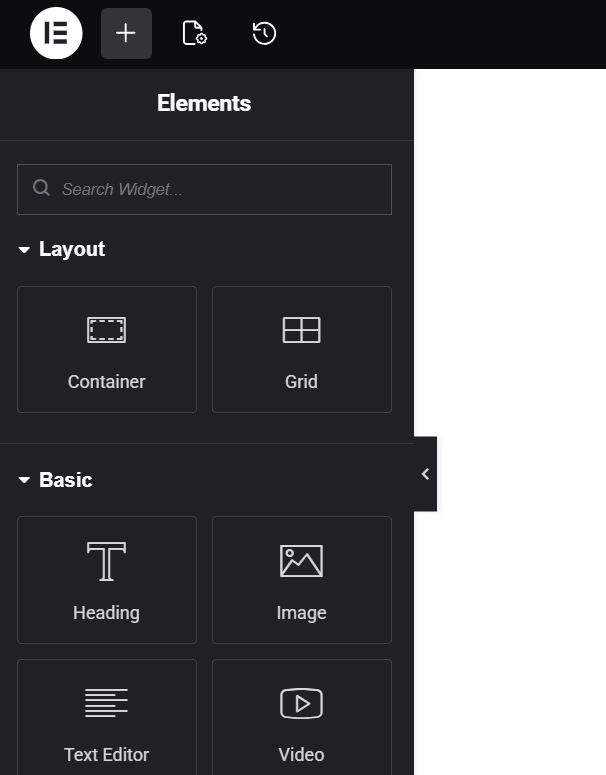
Every widget adds code to the page. Third-party add-on widgets frequently load additional scripts and stylesheets on every page regardless of whether that widget appears on the page. Elementor’s core widget set, Heading, Text Editor, Image, Button, Icon Box, and a handful of others, covers the vast majority of design needs without that overhead.
Master the core widgets fully before reaching for specialized add-ons. Two Text Editor widgets inside separate columns often handle content that a complex accordion widget would overcomplicate. A clean Icon Box grid communicates feature lists more efficiently than an animated card widget that adds three scripts to the page load sequence. Google’s research shows the probability of a visitor bouncing increases 32 percent as load time grows from one second to three seconds. Every unnecessary widget moves the site closer to that threshold.
4. Build Desktop First, Then Fix Every Breakpoint

Mobile-first design is the industry standard in 2026, but Elementor’s editor workflow suits a desktop-first build followed by systematic responsive adjustments. Build the desktop layout completely, then switch to tablet view and fix every element that breaks, then switch to mobile and repeat the process.
Never assume a desktop layout translates automatically to smaller screens. Column widths that work at 1440px often stack incorrectly at 768px. Font sizes legible on desktop become too large on mobile and consume too much vertical space. Elementor’s responsive controls let every element adjust independently at each breakpoint. The Navigator panel in the bottom-left corner of the editor makes selecting specific elements across breakpoints faster and more precise. The guide on Responsive Design Basics for Elementor covers the full breakpoint workflow.
5. Optimize Every Image Before Uploading
Unoptimized images cause more performance damage than any other single factor on most Elementor sites. A 3000px wide photograph in a 500px column still downloads at full 3000px file size unless the image was resized before upload. Elementor’s lazy loading helps with images below the fold, but the file size problem starts at the source.
Compress every image using TinyPNG, ShortPixel, or Imagify before uploading. Convert to WebP format for the smallest file size at equivalent visual quality. Resize images to the maximum display dimensions they will actually appear at on the page before compressing. Keep hero images under 300KB and supporting images under 100KB wherever the design allows. The guide on Adding and Styling Images in Elementor covers the full optimization workflow.
6. Write Descriptive Alt Text for Every Image
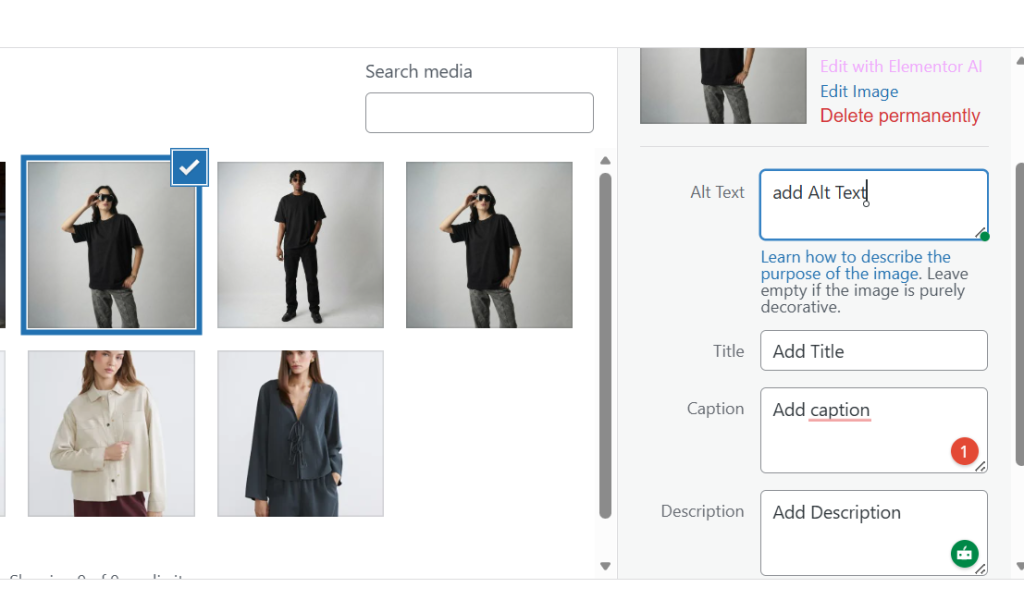
Alt text serves two audiences simultaneously: screen readers that describe images to visually impaired visitors, and search engine crawlers that use alt text to understand image content. Leaving alt text blank fails both audiences. Writing “image” or “photo” as alt text wastes the field entirely.
Write alt text that describes exactly what the image shows. “Red leather armchair, front view with wooden legs” communicates specific content. “Product image” communicates nothing useful to either a screen reader or a search crawler. Every image on every Elementor page needs a descriptive alt text entry before the page publishes.
7. Build a Proper Heading Hierarchy on Every Page
The Elementor Heading widget assigns an HTML tag independently of its visual size. Changing the font size does not change the H1 or H2 tag. Both settings require deliberate configuration, and beginners frequently set visual sizes without checking the HTML tag dropdown in the Content tab.
Every page needs exactly one H1 tag containing the primary keyword. H2 tags break the content into major sections. H3 tags subdivide within those sections. Skipping levels, jumping from H1 to H4 without H2 or H3 between them, breaks the logical hierarchy that screen readers and search crawlers depend on. Never assign a heading tag to text purely for its visual size. Use the Text Editor widget with custom typography settings for stylized text that carries no structural meaning. The guide on Basic SEO Settings for Elementor Pages covers heading structure alongside the other foundational SEO requirements.
8. Name Every Section and Template Descriptively
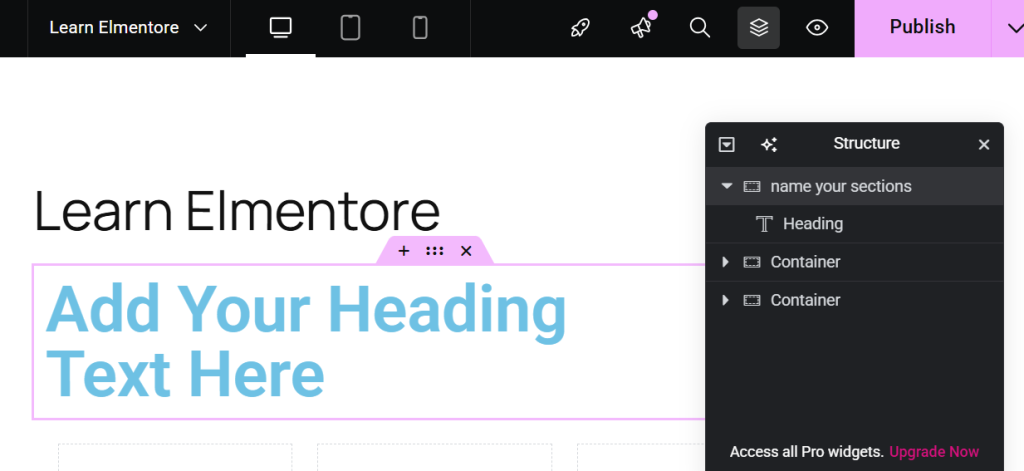
Elementor assigns default names like “Section 1” and “Column 3” to every new element. Those default names make the Navigator panel nearly useless on complex pages with twenty or more sections. Renaming every section and column immediately after creating it costs thirty seconds and saves hours of hunting through unlabeled elements during edits.
Name sections by their purpose: “Hero Section,” “Services Grid,” “Testimonials,” “Contact Form.” Name columns by their content: “Left Feature Column,” “CTA Column.” Save frequently reused blocks as Elementor templates with descriptive names so the template library stays navigable as the site grows. Global templates update every instance automatically when the template changes, which makes reusable components a maintenance asset rather than a liability. The guide on How to Save and Reuse Elementor Templates covers the full template workflow.
9. Use Revision History Before Every Major Change
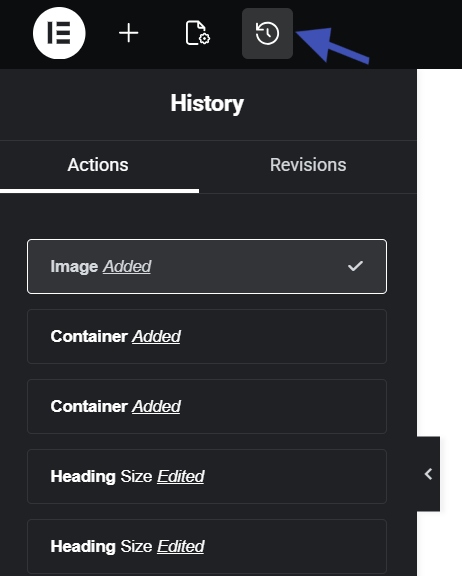
Elementor saves revision history for every page automatically. The revision panel, accessible from the history icon in the bottom toolbar, shows every saved version with a timestamp. Clicking any revision restores the page to that exact state instantly.
Before making significant structural changes, layout experiments, or major content updates, save a manual revision checkpoint. This creates a clearly labeled restore point that makes rolling back to the previous state reliable and fast. Treat revision history as a safety net for every editing session. Pair it with regular full-site backups through a dedicated backup plugin or the hosting provider’s backup service. Elementor revisions only protect page content. A database failure or server issue requires a complete site backup to recover from.
10. Test Performance After Every Significant Build Phase
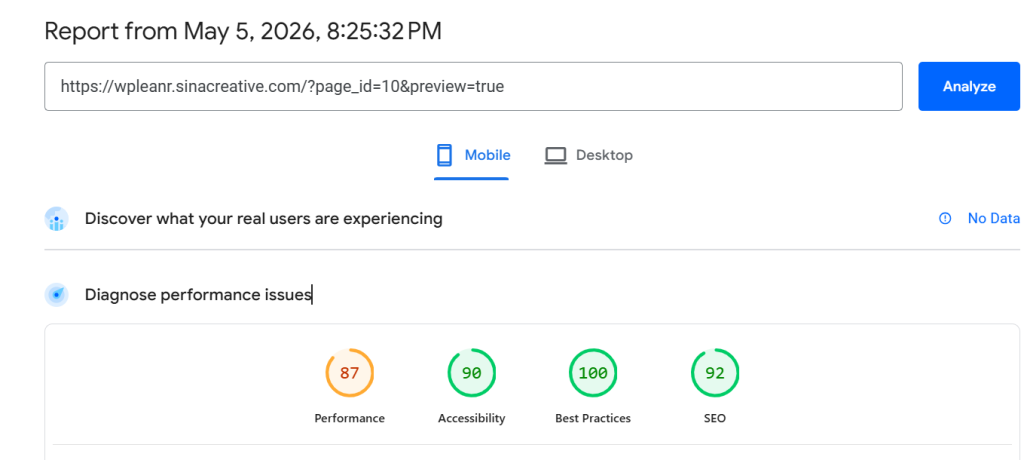
Running Google PageSpeed Insights after building each major section rather than only at the end of the project catches performance problems while the page structure is still easy to change. A score that drops significantly after adding a new section identifies the cause immediately rather than requiring a search through the entire completed page.
Check Core Web Vitals scores specifically: Largest Contentful Paint for image and hero section load speed, Cumulative Layout Shift for elements that move during load, and First Input Delay for script execution blocking interaction. Each metric points to a specific category of fix. A high LCP score points to image optimization. CLS problems trace to elements loading without reserved space. Render-blocking scripts that need deferral cause high FID scores.The guide on How to Fix Common Elementor Loading Issues Fast covers every performance fix category in detail.
Best Practices at a Glance
| Practice | Primary Benefit | When to Apply |
|---|---|---|
| Learn Section/Column/Widget hierarchy | Clean layout structure | Before building anything |
| Configure Global Settings | Brand consistency, fast updates | Before building anything |
| Use core widgets first | Faster page load | Every build decision |
| Fix every responsive breakpoint | Mobile usability | After each desktop section |
| Optimize images before upload | Fastest load time improvement | Before every upload |
| Write descriptive alt text | Accessibility and SEO | Every image upload |
| Build correct heading hierarchy | SEO and screen reader support | Every page build |
| Name sections and templates | Long-term maintainability | Every new element |
| Use revision history | Safe experimentation | Before major changes |
| Test performance regularly | Catch issues early | After each build phase |
Frequently Asked Questions About Elementor Best Practices
How many widgets is too many on a single Elementor page?
No fixed number applies universally, but pages with more than 50 to 60 widgets typically carry enough code weight to affect load times noticeably. The more relevant question is whether each widget earns its place. A page with 30 well-chosen core widgets loads faster and maintains better than a page with 20 core widgets and 15 third-party add-on widgets loading additional scripts. Audit any page that scores poorly on PageSpeed Insights by checking the Network tab in browser developer tools to identify which widgets generate the most resource requests.
Should I use Elementor’s built-in custom CSS or a separate stylesheet?
Elementor’s custom CSS fields, available at the global, section, column, and widget levels, work well for targeted adjustments that affect specific elements. A separate stylesheet through the theme or a custom plugin suits site-wide CSS that applies across multiple pages and contexts. Keep custom CSS minimal regardless of where it lives. Excessive CSS overrides conflict with Elementor’s optimized styles and complicate future Elementor updates. Exhaust Elementor’s built-in style options before writing custom CSS.
Do I need Elementor Pro to follow these best practices?
No. Every practice in this guide applies to both Elementor Free and Elementor Pro. Global Settings, responsive controls, the Navigator panel, revision history, image optimization, alt text, and heading hierarchy all work identically in the free version. Elementor Pro adds more native widgets, Theme Builder for headers and footers, and form handling, but none of those features change the foundational practices that determine whether a site performs well and stays maintainable long term.
What is the fastest way to fix an inconsistent Elementor site built without global settings?
Configure Global Settings first with the correct typography and color palette. Then audit the site page by page and remove manual overrides that conflict with the global definitions. The quickest approach is to use Elementor’s Find and Replace feature for repeated text patterns and to update widgets systematically section by section rather than randomly across pages. On large sites, the audit takes time but produces a cleaner, faster, more maintainable result than leaving the overrides in place. Treat the audit as a one-time investment that pays ongoing maintenance dividends.
Additional Resources
- WordPress Basics and Installation: The Complete Beginner’s Guide
- Getting Started with Elementor in 2026: The Complete Guide
- Understanding Elementor Sections, Columns, and Widgets
- Setting Up Global Colors and Fonts in Elementor
- Adding and Styling Images in Elementor
- Responsive Design Basics for Elementor Sites
- 7 Basic SEO Settings Every Elementor Page Needs
- How to Save and Reuse Elementor Templates Like a Pro
- How to Fix Common Elementor Loading Issues Fast
- How to Use the Elementor History Tool
- Google PageSpeed Insights Documentation
Final Thoughts: Discipline Early Pays Off for Every Edit Later
The difference between a site that stays manageable at fifty pages and one that becomes unworkable at ten is the discipline applied at page one. Global settings configured upfront eliminate manual override hunts. Proper hierarchy produces clean HTML from the first section. Optimized images keep scores high before caching or CDN layers even enter the picture. Descriptive naming in the Navigator makes every future edit faster. These practices require extra attention in the first hour of every project and repay that attention across every hour that follows. If you need to revisit the WordPress foundation beneath all of this, the WordPress basics and installation guide is always the right place to start.